
CNC Turntable Mounts
Tags: innovate and designPersonhours: 3
Task: Model and CNC way to mount the turntable to the chassis
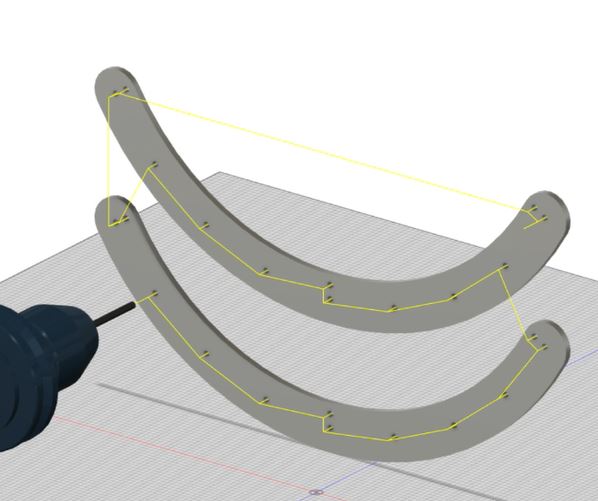
Today we worked on creating a 3d model for a CNC cut part to mount the turntable to the chassis. Since the turntable already has bolts sticking out of the bottom, we decided to use those as mounting points for our part. The most efficient solution to mounting the turntable is to cut a plate that attaches to the turntable bolts and has points to attach legs that will attach to the polycarb base. For convenience, the legs will be vertical tapped rev rails.
Our first decision was deciding where to mount this plate. We determined that there should be 2 plates that attach to opposite sides of the robot. The plates would be curved and attach underneath the nylon gear. Each plate would attach to the turntable using 3 of the turntable's bolts, which uses all 6 of the bolts for mounting. Next, we needed to create bolt holes for the legs to attach to. In order to be able to drop bolts through the holes, this plate must extend slightly outside the turntable, because the plate will be flush with the nylon gear. We created a common radius from the center of the turntable where these holes will be placed, so that there is enough distance between the holes and the nylon gear. These holes would have to be placed so that the attached legs aren't blocked off by the rev rail already on the chassis. To fix this, we decided to put 7 total holes on each plate to mount the legs, all equally spaced around a common section of the circumference. This way we can play around with the mounting points, since we only need about 3 for each plate.
Next we decided whether to mount the plates to the front and rear, or the left and right of the turntable. We counted up how many mounting points were available for each orientation and decided that the front and back mounting would give us a stronger attachment. The front and back are also where the turntable will want to lift up and push down under heavy loads, so it makes sense to mount at those points.
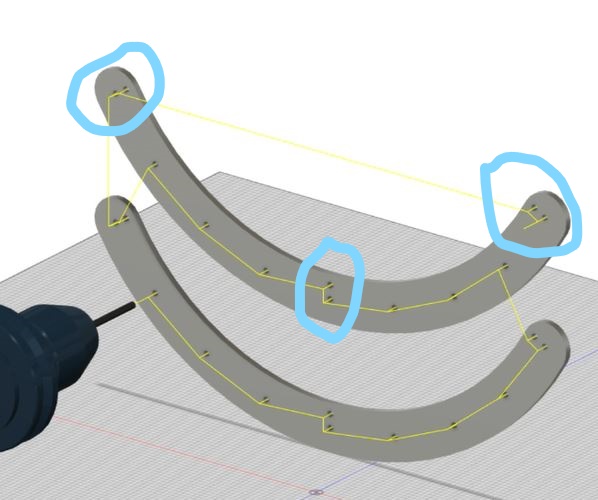
During mounting, we found out that the spaces between the turntable mounting holes and the leg mounting holes at 3 points on each plate were too small to attach a REV rail leg. This is because the bolt from the turntable prevents the REV rail from being flush with the plate. To fix this, we used longer bolts on the turntable and used the revrail legs as both supports for the table and nuts to keep the plate onto the nylon gear/turntable.
Next Steps:
Our next step is to mount the legs to the plate, the plate to the turntable, and the whole thing to the robot. We need to measure out what length of rev rail legs we need to allow the turntable to spin freely without interfering with the chassis. We then need to mark and drill holes in the polycarb base to attach the whole subsystem. These mounting plates still need to be tested with the full capacity of the robot. Any issues should only come from the rev rail legs, which can later be replaced with a more custom solution.