
Explaining Drone Launcher V1
Tags: think, innovate, design, and journalPersonhours: 10
Task: Explain how we arrived at our current drone launcher design
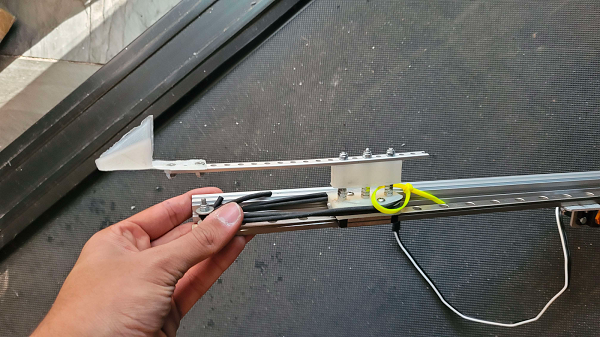
The first iteration of the drone launcher is a simple servo-powered elastic launcher that is controlled like a switch. A linear slide has a servo mounted to the back end and a V-shaped nylon airplane holder is attached to surgical tubing which is attached to a zip tie held by the servo. The system is set on a linear slide, resulting in easy change of the amount of power being transferred to the plane. We opted for a compact drone design so it can easily be held by our airplane holder, which allows for a more consistent launch by reducing impact of draft. Hopefully, our final plane design will have very few open folds, resulting in minimal aerodynamic drag.
The Design Process
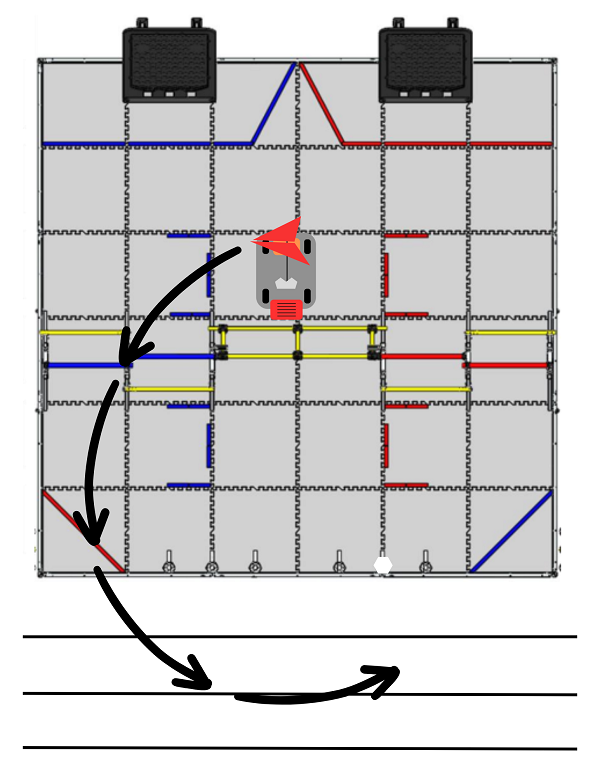
Our first step for creating the plane design was to look at multiple videos on YouTube explaining paper airplane design, in the hopes of getting some inspiration. Our initial thoughts for the trajectory of the airplane was that we wanted it to shoot out to the side, and basically make a U-turn so that it lands parallel to the lines of the landing zones. This way we would lower the chance of the plane flying past the scoring zones. However, as we looked more and more into the physics behind how airplanes work, we realized it wasn’t feasible. Our current plane design was achieved mostly through trial, error and research about lift, drag and thrust.
First, we figured we wanted our launcher to be spring-controlled. Our initial thoughts for the design were to use a holder and a spring that would be stretched and released to launch the plane, but springs are better at launching objects over a short distance and we wanted the plane to be pushed down a longer runway to reduce errors during launching. Next, we turned our attention to rubber bands as a launching medium. This would eventually lead to us using surgical tubing as our mode of tensioning.
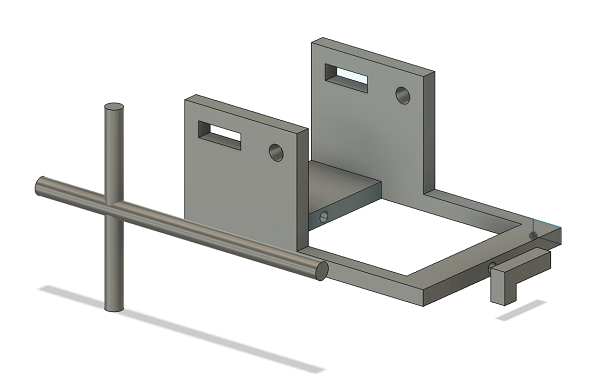
Another initial design was a trebuchet-esque design, pictured below. This consisted of a base plate with a beam on a pivot. The beam would be controlled by servo and tension would be applied through surgical tubing. There would be adjustable axles at the stopping points. Additionally a “sling” would have to be constructed to cradle the airplane. Challenges with this design regarding how to keep the plane in an aerodynamic position and mounting.
Strategy
Our goal for the launcher was to be as straightforward as possible. During the endgame, the drone has to be launched from behind the truss to one of the three distinct launch areas. The launch area closest to the field is the area with the most points allotted. Due to this complication, the drone cannot be launched as far as possible. It must stay within a set distance. As a result of the adaptable design, the mechanism can be coded with a simple on-off type code and can be adjusted mechanically by hand (in tiny adjustments).
Next Steps
Over the course of the season, we expect to keep experimenting with models and shifting them to find the best one for us. Eventually, we hope to have a fully 3D-printed design. As our robot goes through iterations, so will the launcher!