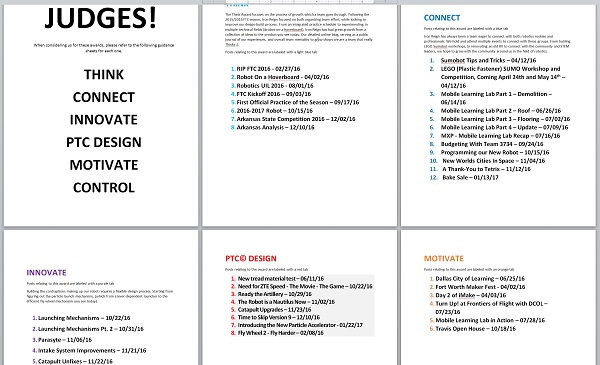
Please help support our team! $40 buys a motor, $55 buys a new battery, $150 adds controllers and sensors, $500 pays tournament fees, $750 upgrades our chassis

Iron Reign

Welcome to Iron Reign at Dallas ISD's Science and Engineering Magnet

RIP FTC 2016

27 Feb 2016
RIP FTC 2016 By Jayesh, Omar, Max, Tycho, Lin, Darshan, Alisa, Dylan, Evan, Ethan, and Trace

Task: Review the events that occurred at the FTC Regional Championship

Link to postmortem document

Iron Reign had a fairly successful run at our regional tourament, much more so compared to last year. Despite reaching the semi-finals, we were unable to advance past the competition to super-regionals. We had many strengths of ours shown through the day, but also committed errors that inevitably caused our loss at the end. At the judges meeting, we did a decent job of eplaining our value as a team to the judges but committed a huge error in not showing demonstrations on our robot and videos over its functions. This made our presentation have less of an impact in that the points we were making had no empirical vale because there were no real world examples to what we were saying that the judges could see. We were pretty successful in the robot game, holding the first position in the rankings for the majority of the tournament. Going into our third match, a weird error caused our robot to not transfer power from the battery to the robot system and disqualified us from the game. In our last match the error persisted and didn't allow us to climb the mountain, which was our main source of points and we ended up outside of the top four teams. In the selection of alliance partners, we were wanted by the first and second place alliances for second pick but were picked up by the fourth place alliance first pick. Through our match with the first place alliance, we lost by a small margin and our other partner with our alliance captain were blown out in the second match, taking us out of the tournament.

Reflections

We had much more success in our regional tournament this year compared to last year, but our luck wasn't with us this year as a few small errors prevented us from moving on to super-regionals. We now look forward to the UIL tournament and will continue holding practices to prepare for that competition in the summer. Some errors we must look at are in ensuring the prevention of random errors in the robot for the game and tightening up our presentation to both convey our team value and provide real-world example to the judges to help connect the two aspects of the team. This will give us a much better chance to succeed in both the robot game, both scoring blocks and climbing the ramp, and help show the judges how are team works and has overall strength compared to other teams. Learning from our mistakes at regionals, we will grow and look to have great success at UIL.

Fort Worth Maker Fest

02 Apr 2016
Fort Worth Maker Fest By Jayesh, Omar, Max, Tycho, Lin, Darshan, Evan, Ethan, and Austin

Task: Show both adults and children benefits of robotics and past work of the team

Iron Reign was invited to present at the annual Fort Worth Maker Fest at the city's Museum of Science. We spent the day showing off our competition bots and other robots that we have created over the years. People were especially interested in our innovation with climbing the mountain and using simple every day objects like tape measures to carry our huge and heavy robot up several feet. We were approached by multiple adults with robotics experience, even one of our previous judges, and were told of how they were impressed with our level of expertise. We also fascinated multiple children with the robotics, with their enthusiasm in trying out the bot in a few mini games and seeing our other robots, such as the balancing robot, hopefully opened their eyes up to possibly pursuing STEM careers in their futures.

Reflections

Our opportunity at the Maker Fest to present to multiple generations of passers-by helped us appreciate the level of robotics knowledge and technique that we have acquired over the years, both as individuals and as a group. To be praised by both professionals in the field and see the level of interest we imparted to multiple children, we recognized that what we have done and will continue doing has meaning, not just for us, but for our community. We had some fun adventures at the museum, including an intense discussion of the DC and Marvel Universes with a few of our booth neighbours and balancing Kibosh on a hover board while attempting to steer(future content incoming).

Robot On a Hoverboard - Try 1

02 Apr 2016
Robot On a Hoverboard - Try 1 By Lin, Max, Tycho, Darshan, Omar, Evan, Ethan, and Jayesh

Task: Try to drive the hoverboard with the competition bot

In the middle of Saturday's event we decided it would be a GREAT idea to put the competiton robot on the hoverboard and try to drive it around. Theoretically if we got it centered correctly it could only drive forward and backwards. We could extend the cliff hanger to move our center of gravity forwards, and then retract to bring it back.

Reflections

We were able to make the board speed up by tilting the cliff-hanger out and extending it, but we couldn't control it enough to completely stop it or keep it steady. We believe that the robot frame isn't completely rigid and is torquing at the center, making the robot unbalanced left/right. Since it's only slightly off balance we can't really adjust it by hand. It seems doomed to drive in circles forever. We tried to turn the robot to a correct alignment by driving with the main treads a little, but the change in center of gravity was too dramatic. The robot quickly veered into Evan, who was sitting nearby.

Day 2 of iMake

03 Apr 2016
Day 2 of iMake By Lin, Max, Tycho, and Omar

Task: Continue presenting at iMake

Day 1 was a huge success, and we carried that over into the Sunday presentations too. There were a lot of common questions we noticed from Saturday, including levels of robotics competitions and the LEGO EV3 system, and we were able to answer these with more clarity after hearing them so often. A few papers were set up on our table outlining the various FIRST competition levels. These helped us easily reference the multiple acronyms FIRST uses for everything, which can be confusing to anyone who hasn't known and competed under them since they were 11 years old.

Reflections

Like Saturday, we interacted with what felt like a constant stream of people. Many were families with kids in elementary and middle school with varying experience in robotics. Some kids had competed in FLL or knew those who had, while others hadn't heard of the systems before. The balancing bot "Gyro Boy" was a good attention grabber when the main FTC bot wasn't doing anything, and it was helpful to compare the two, how Gyro Boy used graphical programming and was completely autonomous, while the main bot used a text language but was controlled by a driver. This almost immediately prompted the kids to ask if they could drive, and Omar showed them the ropes. Younger kids were only shown the drive controls, while the older ones could be taught some of the more interesting tape measure commands. Since the hand was still taped onto the cliff hook many took the opportunity to wave to their siblings and gave high fives to anyone near. However, the robot seemed to be disconnecting more often than it had Saturday, and was hidden to the side so it wouldn't be asked about.

When we brought out Argos, the color following robot, it seemed like every other volunteer took a minute or two to pick up the target and watch the camera follow the movements. Tycho, Max, and Omar traded off on the controls and occasionally let Argos drive too, in order to show how he could back up when too close, and catch up when lagging. It had taken us the beginning of the day to fix the phone mount, but the extra effort was definitely worth it. However unwieldy Argos may be (he is definitely suited to outdoor/large open area events) he is definitely a crowd pleaser.

Hoverboards and PID

09 Apr 2016
Hoverboards and PID By Lin, Omar, Darshan, Tycho, and Max

Task: Continue with the Hoverboard and tweak PID

After the long weekend last week, today was a reasonably relaxed practice. We decided that we could work on anything, as long we stayed focused. The two main foci were the -Robot on a Hoverboard- and fine tuning our PID for autonomous.

Reflections

We experimented with balancing the robot more evenly on the hoverboard to keep it on a straight path and then getting creative with the controls to speed it up. We found that we could effectively rocket it forward by extending and angling the cliff climber while flipping the block dispenser forward at the same time. While it was easy to send the robot forward, there was little we could do to recover outside of just pushing it back by hand. This created a game of hot potato as we passed the robot around from person to person, but was ended rather abruptly when it careened into the table.

If we're going to get our autonomous functional for UIL then we need to fix our PID. We used the parts of the current autonomous demo to check the straight line gyro drive, and went from barely correcting, to crazy oscillations, to a good level in between. This took a decent amount of tweaking for K-proportional, and when we felt we were straddling the line between too much and too little correction we messed around with K-Derivative to be better prepared. After the initial gyro guided line the robot is programmed to do a 45 degree turn towards the beacon, and then fine tune its angle using color blob. The color blob detection seemed to track the selected color accurately, outlining the area in neon green, but for some reason didn't turn to aim at it. If anything it turned away from the beacon. We found a mistake in our error calculation, where leftover error wasn't properly cleared before the guided turn, that we believe caused at least some of the odd turning behavior.

Sumobot Tips and Tricks

12 Apr 2016
Sumobot Tips and Tricks By Tycho

Let's assume you are building a LEGO Mindstorms or Vex IQ based Sumobot, but you want to skip some of the basic mistakes beginners will make. Here are some tips and tricks.

  • Know the rules. It's silly to get disqualified because you didn't pay attention to the rules. Know the size and weight limits. Know the allowed construction materials and techniques. Know the startup behaviors. For example, your robot must not move for 5 seconds after you activate it. This simple rule has tripped up many competitors. And make sure you get to the competition on time to register and get your robot inspected for weight, size and any other requirements.
  • Stay on the field. For this you will almost certainly need at least one light sensor to detect the ring's white edge. We highly recommend two such light sensors placed at the front corners of your robot. This will increase your chances of detecting the edge when coming at it from an angle. You can also adjust your retreat behavior so the robot will be less likely to exit the ring. A retreat behavior usually consists of backing up and turning back toward the center of the ring or scanning for your opponent. You can back up curving away from the sensor that detected the edge first. A third edge detector could be placed at the back of your robot - but this is almost never needed. It would be only useful if you have a behavior that could trigger backing up when the rear of your robot is close to the edge. Theoretically you could detect the edge when being pushed backward by your opponent and try to twist out of the way, but we've never witnessed anyone pulling off this advanced behavior.
  • Build to the maximum weight for the competition. If your bot is heavier than your competitor's, you will have an advantage in traction and with inertia. You will be harder to push around and can more likely push them around. We've seen teams use extra unpowered motors to help maximize weight. Use a scale to be sure you don't exceed the allowed weight.
  • Build compact. Your robot should be as small and dense as possible. Air gaps within your robot and on the exterior should be kept to a minimum. The larger your robot is, the more likely that your opponent will contact a part of your robot far from its center of mass. When it pushes against this part, it will very easily turn your robot in a different direction. Most likely this will be to your disadvantage. You will also be very unlikely to push your opponent in the correct direction when in this condition. Also, the rules say that the first robot to have any part touch the surface that the ring is sitting on is out. If you have a large robot, it is much more likely that part of it will touch-out.
  • Build Low. The lower your center of gravity, the less likely your opponent will be able to topple you or force your wheels to lose traction.
  • Build a Skirt or Shield. A Sumo Shield is a smooth ramp that decends from the front of your robot down to the surface of the ring. The purpose is to create a wedge that will go under your opponent when you come into contact. The wedge will lift your opponent, transferring their weight to your robot. As a result your wheels can increase traction while theirs will decrease. A skirt is a shield that surrounds your entire robot, making it look like a cone or pyramid, so it works wherever the contact point is. But a skirt can be much harder to engineer. They have to be very sturdy, not impede your own movement, and not get in the way of any sensors you might use. Skirts and Shields also increase the size of your robot, so you have more risk of touching-out. Particularly if you have a hinged shield. Hinged shields are great for staying as low as possible to get under your opponent, but they need to be prevented from dropping down when over the edge of the ring. A floating skirt is a wall built around your robot that is only loosely connected or not connected at all to your robot. Instead your robot pushes the skirt around the ring and the skirt's weight keeps it flat against the floor. This makes it unlikely that your robot's motions will create a gap that your opponent can get under. And if your opponent does get under the skirt, they haven't necessarily started lifting your robot to steal traction. You could also have a sensor that detects if your skirt is lifting and back away when that happens.

We've seen well-engineered robots with only edge sensors win big competitions. A solid, heavy and low robot with a great skirt will conquer when none of its opponents has the same features. Once you are in this category you can consider advanced tips.

  • Locate your prey. Actively seeking your opponent creates an advantage. It's also fun. Usually a forward-facing ultrasonic sensor is a good choice. You can scan for your opponent by making your robot turn in place while checking the sensor to see if it detects something close. Calculate the maximum distance your opponent can be from your ultrasonic sensor. Simply place your robot backed up to the edge of the ring and measure the distance from the front of your ultrasonic sensor to the opposite edge of the ring. Subtract the minimum size of an opposing robot. For LEGO sumos that would be about 6 in. or 15 cm. If you see anything closer than this you can assume that you've detected your opponent. (Or you've detected humans if you've failed to keep everyone at a proper clearing distance from the ring, including the operators) Continue your turn for a fraction of a second and turn on your charging behavior. Make sure you are aware of the minimum distance your sensor can deal with. You will probably want to recess your sensor from the front of your robot so that it will continue to register your opponent even when you are right up against each other.
  • Organize your software. Beginners will often design software that will do one thing at a time and be unable to react until those things are complete. For example, on detecting an opponent, charge for X rotations of the wheel. While the robot is trying to complete those rotations it's not looking at sensors, so it doesn't detect the ring and drives off if it was too close to the edge. We will post a complete lesson on designing software that always lets the highest priority behaviors (back-away-from-the-edge) interrupt the lower priority behaviors (scan-for-prey).

LEGO (Plastic Fastener) SUMO Workshop and Competition, Coming April 24th and May 14th

12 Apr 2016
LEGO (Plastic Fastener) SUMO Workshop and Competition, Coming April 24th and May 14th By Tycho

LEGO Sumo returns with a free Sumo Workshop on Sunday April 24th followed by the Dallas Personal Robotics Group's Roborama Sumobot competition at the Dallas Makerspace on May 14th.

Here's what the competition looks like:

A basic sumobot is a simple build. Here is an example to get you started: http://nxtprograms.com/mini_sumo/steps.html

If you have multiple NXTs or EV3s, then your team could make multiple sumobots. Typically 1, 2 or 3 students will work together on a sumobot entry. Start by making your robot charge forward while staying in the ring. If you get that working take the next step and add an ultrasonic to hunt your opponent. Plastic Fastener (LEGO or VexIQ) Sumobots need to fit within a 1 foot square footprint and weigh under 1200 grams. Full rules can be found here: https://dprgblog.wordpress.com/rules/

Teams are also encouraged to consider the novice line-following competition in the same rules document. Students compete in Roborama for free. Prizes include full robot kits. There is room for only 40 sumo robots, so please register soon: https://dprgblog.wordpress.com/pre-registration/

Come to the Sumobot Workshop Sunday April 24th from noon to 4pm at the Dallas Makerspace. DPRG members and members of FTC Team Iron Reign will be hosting an open sumo workshop at the Dallas Makerspace in Carrollton (map). Bring your sumobot, parts and laptop and you will find help with build and programming. Sumo rings will be provided. Line following help will also be available. An adult needs to accompany and remain with each team of students - this is not a drop-off activity, but parents can tour the Makerspace. If you can't make the workshop, at least check out our Sumobot Tips and Tricks. Add to calendar

And don't forget the competition itself on Saturday May 14th from 10am to 4pm: https://dprgblog.wordpress.com/

Making a Ports Map

28 May 2016
Making a Ports Map By Omar and Jayesh

Task: Create a list of motors/servos and what ports they're connected to

Very often, when we disconnect a motor or servo (maybe on accident), we forget what port we got it from. This even happened to us today when we unplugged the servo that lifts the trough. Because of this hassle, we decided to write out a list of all the motors and servos on our robot and what port they're connected to so we can refer back to it if we ever forget where we took something from again.

Reflections

This didn't take us much time at all and was easy to do, so we might want to make a lot more of things like these in the future to keep ourselves organized. Organization is definitely something we need to work on for this next competitive year, and even small things like these help out with that.

New tread material test

11 Jun 2016
New tread material test By Lin, Tycho, Max, and Evan

Task: Initial tests for new tread material

The standard Tetrix treads and tread inserts aren't nearly as sturdy as we would like. When they snap it's a real effort to put back together stretched over the idlers, and the inserts peel apart, bringing our traction down. The new material is a rubber conveyor belt material from Andymark, and the underside track chain is 3D printed in nylon to mesh with the track drive gears. Outside: high strength high traction rubber Inside: 3D printed nylon to mesh with gears

Reflections

We first glue the nylon sections to the treads, laying them out flat so that some of the nylon hangs over one end and let them set overnight. The next day we bend it into a loop and glue the overlapping nylon and rubber together, and then let that set overnight. This isn't strong enough alone, so we ended up using the awl (used previously in Cascade Effect's game) to stitch at the boundary between two nylon strips, sort of like a thread staple.

Initial tests showed that this design was a huge step up from the tetrix treads, and we're working to make another to complete the pair. One downside is that this design is a much thicker design, and rubs on the underside of other parts that weren't previously a problem.

Mobile Learning Lab Part 1 - Demolition

14 Jun 2016
Mobile Learning Lab Part 1 - Demolition By Evan, Max, Tycho, and Austin

Task: Redo the inside of the recreational vehicle

Mr.Virani recently aquired an RV so it could be used as a mobile learning center for the Dallas City of Learning this summer. To convert it from someplace you might live on a long road trip to somewhere you could teach science and technology to children means stripping out carpeting, removing walls, and laying down easily cleanable floors and standing height work benches. We also have to put in a lot of computer equipment and 3D printers that Big Thought is providing. It's going to be a long proccess.

Max and Tycho have completed a lot of demolition. They've removed the bed revealing a strange trap door that we need to look under. The table and chairs are gone as are some of the cabinets. The sofa was metal framed and too big to move out of the door or windows, so they had to cut it apart with bolt cutters and grinders. They ripped out most of the bathroom relying on the big sawzall. The mess of remaining plumbing and exposed electrical wiring looks very scary. And the pile of demoed materials has already grown quite a large:

Dallas City of Learning

25 Jun 2016
Dallas City of Learning By Ethan, Evan, Jayesh, Omar, Lin, Max, and Tycho

Task: Teaching children how to use robots

On 18 June, we went to the J. Erik Jonsson Library to inspire children to hopefully go into STEM-related careers. We were invited for their annual City of Learning event. We talked to about 200 people about robotics and most loved it - especially children. We showed them Minion, Argos, the ball-flipper, and Geb (the new name for our FTC bot).

We presented alongside a kids' robotics sponsor and Polyprinter.

Reflections

We got a good amount of people and got a good amount of kids interested in our robots. It was fun to talk with the other vendors at the fair, interested parents, and hobbyists.

Mobile Learning Lab Part 2 - Roof

26 Jun 2016
Mobile Learning Lab Part 2 - Roof By Tycho, Max, Matthew, and Austin

Task: Clean the roof of the RV

We'd noticed that the roof was very grimey looking from the small strip you could see at the top of the side walls, but we hadn't been up there to look at it. Finally climbing the ladder we confirmed it. The roof is a very dark brown. We believe it is simply dirt that has caked into the sticky/gummy surface. It's probably not supposed to be so sticky - it kind of seems like a layer of decaying caulk laid over the rubber roof. We confirmed that this layer should be white. It covers the black EPDM rubber roof that serves as a weather barrier. Because the roof is so dark, it absorbs tons of sunlight, making it much hotter inside. We needed to clean it.

So we spent today powerwashing the roof. In the morning Matthew (from SEM's FRC team) came over with his father's power washer and we got about 1/2 of the roof partially clean. When Matthew had to leave at noon, Mr. Virani purchased another more powerful washer and we continued washing until dark. Austin, from the other FTC team at our school joined us in the early afternoon. So now all three robotics teams at SEM have contributed time to the mobile learning lab.

Here you can see the dramatic difference that powerwashing has made. We hope this will cool the vehicle enough that we can operate with only the roof airconditioners so we can turn off the main engine while on station.

Mobile Learning Lab Part 3 - Flooring

02 Jul 2016
Mobile Learning Lab Part 3 - Flooring By Evan, Max, Tycho, Dylan, Ethan, Lin, Darshan, and Austin

Carpet ripping is not fun. The carpet is tacked down with so many staples that is is not easy to remove. It tends to rip around the stables leaving nubs of fibers and then we have to attack the stables with pliers and staple pullers. Getting it out from under the edges of walls and the slide out is really hard. And we've gouged the subfloor where removing the old kitchen and bathroom vinyl required heavy work with scrapers. We tried putting down some vinyl planks, and those are much tougher to work with than you might guess. We only got a small portion of the floor demoed today. It's kind of daunting how much work this is. In the end it will be all worth it because we will have provided a place for children to learn skills that will help them in their future working lives.

Mobile Learning Lab Part 4 - Update

09 Jul 2016
Mobile Learning Lab Part 4 - Update By Ethan, Max, Tycho, Lin, Jayesh, Darshan, Austin, Matthew, Evan, Dylan, Omar, and Trace

Task: Covert a 1998 RV into the Dallas City of Learning Lab

The RV exterior


We have finished the majority of the renovation of the Dallas City of Learning Lab. We've finished rebuilding the roof, going throught the plumbing (including the suspiciously secretive water tank), and also replacing the entirety of the flooring.

to

The RV interior

to

A full tour of the RV pre-renovation can be found here.

Changes

  • Removed restroom
  • Replaced carpet with laminate
  • Added widescreen TVs
  • Added black workbenches
  • Removed table
  • Removed cabinet to make room for more technology
  • Removed some 90s decor
  • Removed bedside tables and cabinets
  • Added 3D printer
  • Removed bed
  • Removed couch
  • Removed 90s decals
  • Added shelving
  • Cleaned a decade of muck off of it

Reflections

We've put in >250 hours working on this RV. It's going to become a mobile robotics lab so that we can inspire kids to enter STEM-related careers and hobbies. Uaing this van, the team can reach out to children who otherwise would not have the oppurtunity to learn how to build and program robots, as well as gaining skills related to that, such as using a 3D printer.

Geb Fixes and Adjustments

10 Jul 2016
Geb Fixes and Adjustments By Jayesh, Omar, and Lin

Task: Prepare Geb for competition and get it into running condition

With all of the large projects and events that Iron Reign have been commiting to (with more still to come), we have unfortunately been neglecting Geb and as we came to find a few weeks ago, many of the running parts that give us the majority of points in competition were falling in disrepair. We found that the tape measure system was repeatedly falling out of alignment, the beater bar rungs were getting tangled with each other, and our wire mapping was off in multiple locations. Besides those major problems, we had multiple set screw issues, tread dislocation, and syncing issues with our phones. Going periodically through the problems, we were slowly able to get our robot into its previous condition and replaced multiple older parts that wouldn't have held up in competition.

Reflections

Finding time to go through and bring Geb back to its previous condition is obviouslly vital for our upcoming UIL competition in Austin. Despite the obvious need for these fixes, we were able to see which mistakes could've been prevented and we made new guidlines to keep up Geb's condition. For example, on our tape measure system, we created a series of marks on each adjoining motor to match up and ensure they don't fall out of alignment. Lin also color coded the opposite sides of all the wires so we wouldn't have to keep tracking from one end to the other when we got confused as to where each wire was supposed to go. Combining this system with the wire map Omar and I had made (as discussed in an earlier post), we should now waste a lot less time on wire management and make major fixes much easier to carry out and finish from now on. With Geb's major part's in pristine condition, we need to focus on autonomous and driver practice for UIL.

MXP - Mobile Learning Lab Recap

16 Jul 2016
MXP - Mobile Learning Lab Recap By Jayesh and Lin

DCOL Mobile Tech XPerience (MXP) Begins Service

Written by Jayesh Sharma
Edited by Lin Rogers

Iron Reign has been actively supporting Dallas City of Learning (DCoL) for a few years now. Big Thought (managing partner for DCoL) received a grant from Best Buy to support STEM learning over the summer by taking STEM opportunities into communities so that kids with reduced access to transportation wouldn't be left out. The original idea was to pack a cargo van with technology that could be dropped off at community centers, libraries, schools, churches and other public facilities where kids could experiment with tools and technologies that would'nt normally be available.

But Big Thought, true to the name, decided to scale up the vehicle into a true mobile learning laboratory. Because the budget remained tight, they needed to create a mobile classroom on a shoestring. So the new idea was to repurpose a used RV large enough so that 12 students could productively work on board while many more could participate inside the visited location. While Big Thought handled putting a sweet new skin on the vehicle, we volunteered our time to renovate the interior.

When we received the vehicle, it was cramped on the inside, with everything needed for a portable family living space. We removed a bed, couch, and restroom (complete with bathtub) and opened the space up for more gadgets. We tore out extra cabinets, shelving, tables, chairs, light fixures and mirrors. We ripped out the old carpet and replaced it with wood-grain vinyl, installed wide screen instructor's monitors over the driver's seat, added work benches along the perimeter and created a bay to hold four 3D printers. Max is still working on a 3D print server so that the printers can be access through the on-board wifi. We spent a whole day power-washing the roof to reveal the original white surface that could reflect away more of the sunlight so the air conditioners would have a chance against the Texas summer heat. On the inside we painted the walls and cabinets black and added diamond plate trim and LED lighting to give it a tech/industrial feel.

Including the time it took to clean about a decade’s worth of grime and dust, the team has put one and a half months and over 350 person hours of work into this vehicle, resulting in the mobile technology lab that went into service last Thursday. Throughout the course of renovating this vehicle, we affirmed the value that STEM education has for our society. Our building experience with robotics was a great advantage when working on the RV’s design and construction. The team’s engineering and design skills were put to the test and our efforts have been very kindly received. The team will continue to help DCoL spread STEM opportunities and values to those who otherwise wouldn’t have had access to them. Next Saturday we'll be going back to the Frontiers of Flight Museum to staff the vehicle for the DCOL Turn-Up there. We hear the vehicle will be pulled inside the hanger. Museum admission is free that day, we hope to see you there!

Turn Up! at Frontiers of Flight with DCOL

23 Jul 2016
Turn Up! at Frontiers of Flight with DCOL By Janavi, Darshan, Jayesh, Lin, Max, Tycho, Omar, and Austin

Inspiring 1,000 People to Turn Up with STEM

Written by Janavi Chadha

The Dallas City of Learning Organization held a Turn Up event at the Frontiers of Flight Museum, where we staffed the Mobile XPerience (MXP) complete with laptops, 3D printers, and LEGO SumoBots. Outside the vehicle, Lin and I taught kids how to create 3D models of houses using SketchUp. Then we let the kids bring their designs to life by designing and 3D-Printing keychains.

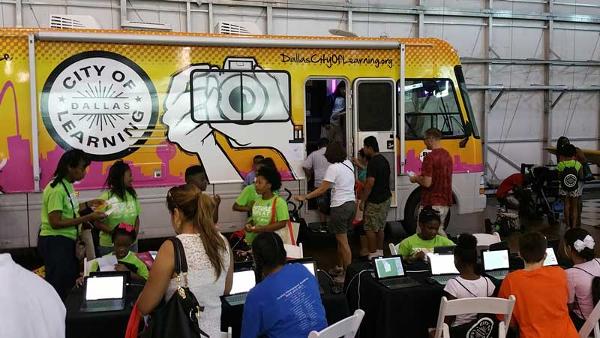
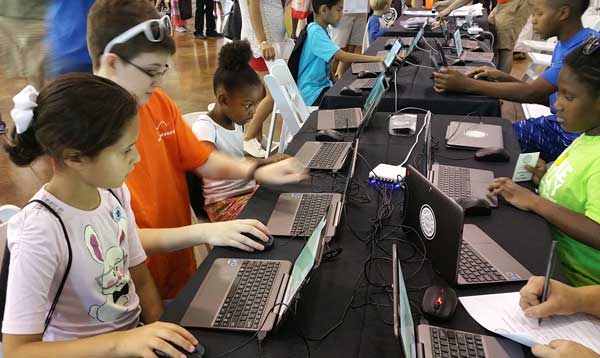
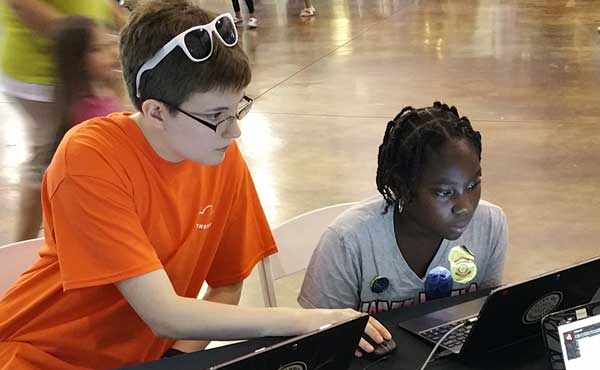
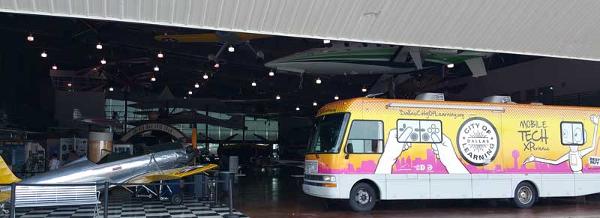
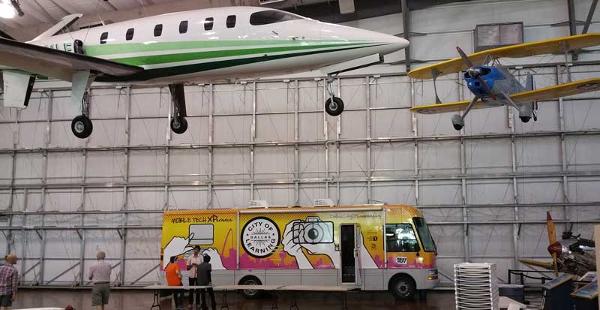
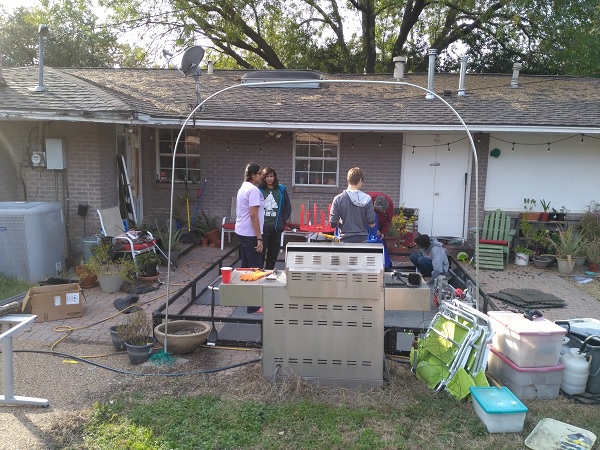
On board Max managed the bank of four 3D printers while Tycho and Austin taught kids to build virtual structures on our Minecraft server with the education version of the software.

Out to the side of the MXP, we set up a ring for the sumo lego robots to battle in, teaching the kids how robots can be programmed to react to the world around them. Jayesh, Omar and Darshan manned that station and also demonstrated our FTC competition robot.

Omar ran minion (our robot walking companion) around the museum Pied-Piper fashion, leading kids back to our activity stations in and around the vehicle. On the way he taught kids to operate the robot with its touch and rotation sensor based leash. At one point he took minion over to challenge the airport's 700lb bomb disposal robot. That robot was not impressed.

A few more pics of the MXP in the museum while we are striking the exhibit:

Person-hours note: The night before Max and Tycho spent 5 hours getting the vehicle ready.

Mobile Learning Lab in Action

28 Jul 2016
Mobile Learning Lab in Action By Lin, Max, and Tycho

Task: Deploy the Mobile Learning Lab to camps and teach kids

The RV has been fully remodeled and set up with netbooks and 3D printers, so we have been making the rounds and teaching at camps and events. We try to limit the number of kids on board to under 15 or 12 for safety reasons. It'd be nearly impossible to fit more kids and be able to effectively teach.

Reflections

When we first drove up to one deployment of the RV there were a lot of kids staring, because honestly who wouldn't; the RV is huge and bright. We couldn't set up fast enough before people wanted to come inside. We split the group into modelling and robotics and got started. In the back, robotics kits were scattered on the floor, and groups of two or three were following a video to build a 5 minute bot (it generally took them longer though). When the bots were built we had a crash course in the EV3 programming environment and helped them think analytically about how they wanted the robots to behave when on different sections of the sumo. We didn't give them a program to use, they told us what to put. The result? An exciting free for all complete with screaming cheers and flipping of bots (video above).

Max and I led the modelling with the basic "build a house" tutorial below. After they got the hang of that we set the software sizing up so they could make a keychain and print it. Some people got really into their house and ended up emailing the file to themselves to continue later.

Robotics UIL 2016

01 Aug 2016
Robotics UIL 2016 By Ethan, Evan, Lin, Darshan, Jayesh, Janavi, Trace, Max, Tycho, and Omar

Task: Compete in UIL Robotics in Austin

A bit of background:
UIL is a Texas-specific organization that hosts competitions in both academic and athletic pursuits. This year, they ran a pilot program for Robotics, using the FTC rules and field from Res-Q. About 72 teams competed in the FTC-based competition, which then was split into two catagories. Unlike regular FIRST tournaments, the awards not earned by competition are given through nomination by other teams.

  • Mentor Recognition Award
  • Leadership Award
  • Creativity in Design Award
  • Gracious Professionalism Award
  • Play of the Day Award
  • Safety Award
  • Team Spirit Award
On Wednesday, July 27, the team came down in a charter bus, with the MXP. That night, we did some last-minute working on the robot. [insert image here] The next day, we woke up early, and headed down to the Austin Convention Center. We pitched a tent and blow-up couch, and generally set up. We used the competition as an opportunity to promote our twitter. The first match, we did horrible. Our robot dug itself into the ground as if it were near the trench-lines of WW1. After giving us its best WW1 re-enactment, it started jettisoning parts, similar to how a Space Shuttle jettisons its external tank. Matches 2-5 were mostly uneventful. We only won two of them, but there were no similar dramatic happenings like match one. After match one, we atttempted to present our team to other teams, as we brought in a TV. A quick list of notable things that happened in this time period were:
  • Bringing one of the 3D printers inside and printing parts
  • Making a last-minute climber-holder
  • A bird flying into the convention center
  • Our presentation computer updating to Windows 10
  • Our robot falling off the mountain

On Friday, we were not picked to be in the final matches, and unfortunately, we were not picked for any awards. We did, however, meet up with our school's FRC team and say hi, as their competition was starting. After the awards ceremony, we decided to leave. On the way back to the hotel, we noticed the Texas Workforce Commission building, which is one of our sponsors. So, we parked our RV up by the side of the building, and walked in. We talked to the receptionist, and within a few minutes, one of the TWC execs came down to talk to us and take pictures. We gave them a tour of our RV as well, and they seemed impressed, even if it was in post-tournament disarray.

Reflections

While this tournament was not our best tournament by a margin the size of the Mongol Empire circa 1279 C.E., we were able to interact with teams in Texas that we normally would not have, get exposure for the MXP all the way down I35, and talk to our one of our sponsors in person. As well, it gave us experience for the future and was a great teambuilding activity. If we get invited to UIL next year, we know what to do to win.

Meeting with The Texas Workforce Commission

01 Aug 2016
Meeting with The Texas Workforce Commission By Jayesh, Omar, Max, Tycho, Darshan, Evan, Ethan, Janavi, Lin, Trace, and Dylan

Task: Connect with our sponsors in the Texas Workforce Commission

Following the conclusion of the state UIL competition, Iron Reign noticed the Texas Workforce Commission building. Given that the organization was one of the team's generous sponsors, we wanted to show our gratitude and headed into the building. Upon greeting the clerk, we made it apparent that we didn't wish to disturb anybody, but wanted to see if anyone was available from the Commission who we could thank for helping us with FTC. There was an enthusiatic response, as immediately several officials, including Commissioner Ruth Hughs came down to meet with us (I guess we got really lucky with our timing). Upon inquiry, we instantly gave them a brief overview of why we were in Austin (#UIL) and what our team was built on. We spoke on mechanical aspects, such as the robot itself, and also spoke about our several outreach events. We answered questions about FIRST and the general consensus was impressed with the dedication and work we had put into the competition and team. As a tangent to the amount of work we had put into FIRST, Hughs spoke to us about expanding the role of organizing and growing the general workforce. She told us how it was the work of people like us that made her job of organizing us worth it. She also advised we meet with Chairman Andres Alcantar, a big supporter of STEM, as he wasn't in town. After talking about all these topics, we invited the officals to come inside the Mobile Tech Xperience and see what it was like for the kids we taught using the vehicle.

Reflections

Getting the opportunity to meet with one of the larger organizations in Texas was very educational for us. While we helped the Commission better understand the investment they've made in FIRST, we also learned yet another aspect of our future in the American workforce. The connection we built with the Commission emphasized the role of STEM and robotics in our future. Driving the robot around, while showing off the multiple components on it, we gave the officials plenty to think about in terms of future opportunities. We hope to take the lessons learned at the TWC and use it to build on our future endeavors. Thank you to the TWC for having us!

Outreach and Sponsors

20 Aug 2016
Outreach and Sponsors By Lin, Darshan, Jayesh, Omar, Ethan, Evan, Janavi, Tycho, and Max

Task: Analyze how finances effect recognition

It's always a challenge to convince sponsors that we are a worthy team for their grants, visibility in FIRST and the public makes it easier. Teams whose schools have the finances and space to host a tournament are recognized by their peers and even get a boost to Regionals. However, our space is limited, and we wouldn't be able to pull off a quality event if we tried to host. Because of this our opportunities to get noticed by frequent veteran judges are limited, and we step up in outreach to make up for this.

Working with the Mobile Tech XPerience has been a huge amount of fun and a great learning experience, while being extremely visible to say the least. The MXP works to provide equal access to STEM technology to disadvantaged neighborhoods, and we teach modeling and NXT robotics. We get first shot at staffing the vehicle because of how closely we worked with them in the creation. The team was recognized in a CW33 Class Act for our efforts, and this is an incredible help to our sponsorship efforts. We want to tell potential sponsors that Iron Reign is a team that will put everything into getting out and interacting, and we have the evidence to show that.

Planning Meeting

03 Sep 2016
Planning Meeting By Janavi, Max, Tycho, Jayesh, Omar, Darshan, and Lin

Task:

This week we met to discuss the origination of the meetings for the upcoming year. We decided that for the first fifteen minutes of the meeting we would outline our plans for the meeting. Then during our lunch break we would get together once again to discuss the progress that we have made and what we will move onto by the end of the meeting . By structuring our meetings we will be able accomplish more in the same amount of time and at the end of the season we will be able to better analyse our accomplishments.

Reflections

Organization has always been a challenge for Iron Reign and we hope that by doing this we will be able to eliminate any periods of time during the meeting where people don't know what work they should do.

FTC Kickoff 2016

10 Sep 2016
FTC Kickoff 2016 By Ethan, Evan, Max, Tycho, and Omar

Task: Go to the FTC 2016 Kickoff to preview the new Velocity Vortex challenge

This Saturday, we ventured down to UTD to watch the unveiling of the new FTC challenge, and collaborate with other teams. The main change we noticed is that this year, it seems like there is a greater emphasis on league play instead of just doing a qualifier. To go to regionals, there seem to be three options:

  1. Do league play and go to one qualifier
  2. Do league play only
  3. Go to two qualifiers (But you may have to give up your spot to other teams)
Other minor changes for this year are:
  • Adding the Nexus 5 to the list of approved phones
  • New(hopefully less buggy) version of the FTC controller app
  • Ambiguous rule about not damaging the field
  • Red/Yellow card penalty system
The new app is great for our team, our Adafruit IMU is now officially supported, so we don't have to use the Swerve Robotics library anymore. As well, you can now configure phones through the driver's station, making testing faster. FIRST added support for many new sensors and we are intrested in trying them out. The new challenge is radically different from last year's challenge - strategies this year will mainly focus around defense. Our preliminary ideas are:
  • Standing at the ramp and circulating particles around it
  • Beacon defense - it seems to be the easiest way to get a lot of points
  • Capping the "vortex" with the yoga ball
  • Spinning the vortices around so fast that no team can score
We are considering using Pele as our robot, as it can already shoot balls and has an intake system, we'd just need to add a beacon-poker and lift to cap the vortex.

Reflections

This year's challenge requires us to "think outside the box" in order to progress. As well, we really need to work fast, as if we do league play, the competitions happen sooner that the traditional qualifiers.

MXP Transportation

10 Sep 2016
MXP Transportation By Darshan, Lin, Jayesh, Omar, Ethan, Evan, Janavi, Tycho, and Max

Oh the places you'll go!

We attend many events throughout the DFW area, taking our robot and whatever else we need along with us. This has often puts a strain in how much we can actually bring with us to FIRST events and STEM events in general. Over this past summer the team helped refurbish an old 90s RV to use as a Mobile Tech XPerience to drive around and help bring STEM to kids. Since the team put in the work to revamp the RV and worked so closely with the nonprofits involved, Big Thought gave us first dibs at using it when it's not out on deployments during the weekends. The MXP gives us a way to transport us and our materials to places that would otherwise seem unlikely. We can also use the MXP in collaboration with DISD to fund trips out of state and other competitions.

With the MXP at our disposal, bringing it to events can not only provide benefits to ourselves but also to other kids and teams. Plus it looks cool.

First Official Practice of the Season

17 Sep 2016
First Official Practice of the Season By Omar, Lin, Jayesh, Darshan, Ethan, Evan, Janavi, Max, and Tycho

Task: Pull ourselves together for the new season

At this practice, our goal was to get everybody familliar with this year's game, Velocity Vortex, and to brainstorm some ideas for this year's robot. Some organization also needed to be done in terms of parts (everything is everywhere and nowhere at the same time) and also in terms of this year's meeting structure. Last year was somewhat unfocused and chaotic and we need to get a better grasp of things.

Reflections

We managed to get a decent amount done today. Jayesh described our new meeting structure: we begin with a group discussion of what we'd be doing that day, then would separate and work, then around mid-meeting we'd eat some food and while doing so talk about what we've done, then separate again and continue working. Hopefully we're able to stick to this schedule.

Jayesh and I also made a small table of possible wheel base options, such as using either Mecanum wheels or returning to the omni-wheels of yore. Evan and Darshan disassembled the mountain from last year's field and put it outside near our tent. We discussed several things, such as some interesting rules about how our robot will not be able to grasp onto any part of the center structure, and therefore could not stop it from rotating by doing so. We also discussed League play, and it's advantages/disadvantages. A large weakness of ours is lack of testing, and these League meets would definitely let us get some more practice in before the big qualifiers.

Evan and Tycho both tried to explain designs for this year's robot that they'd thought up. Evan, by using some loopholes in the rules, designed the premise for a robot that would park itself right in front of our Corner Vortex, having with it at least two Particles, and would cycle them through the Vortex over and over again. Even though each Particle that goes through would only be worth a point, Evan argues that these will add up since his design will be quick at cycling. Tycho's idea focuses instead on the Center Vortex; he explained that his robot would have ball intakes on opposite sides of the robot so direction wouldn't matter (unlike last year's robot, Geb), and would have some sort of mechanism in the center of the robot that would shoot Particles up and through the Center Vortex. So far, most of us are aligning more on Tycho's side of the design wars, but Evan's persistence might win us over. Who knows.

One other thing Jayesh, Evan and I decided on (question mark?) is a general plan for this year's autonomous that we 100% need to work on to be successful: the robot will hit the beacon buttons, then move to the center of the field, hit the cap ball out of the center, then park in the center (not neccessarily fully). We thought this was realistically possible given the time that we have until competition.

Budgeting With Team 3734

24 Sep 2016
Budgeting With Team 3734 By Ethan, Evan, and Austin

Task: Create a Budget Sheet for the 2016-2017 Season

As always, Iron Reign needs more money. We are a title 1 school in a cash-strapped district with over 60% of students qualfying for free lunch. So, this year, we decided to *actually* make a spreadsheet to track what we need and how much it'll cost. Coincidentally, our sister team, Imperial Robotics made one too. Also, this year, we're going to share a practice field at our school, SEM. So, we've combined our costs into one spreadsheet for potential sponsors. We are considering these grants:

Reflections

We really need to start applying for grants - many of them have already started accepting applications or are about to. Considering that our estimated costs for this year are >$2500, these grants are extremely important to us. You can help us today by clicking the donate money up top!

Building the Robot Base

01 Oct 2016
Building the Robot Base By Jayesh, Omar, and Darshan

Task: Design and test implementation of a driving base

We have spent the last few practices formulating a new driving base for our robot this year. We went through various possibilities: tank-based drive using both tracks and the omni-regular system (both of which are systems that we have utilized in previous years). However, both systems showed inefficiencies with this year's competition. We decided to go to a system using mainly Mecanum Wheels, complemented by an extrusion-based attachment system.

Reflections:

The three options that we had for the driving base(Mecanum, omni, tracks) all had different strengths and weaknesses that we judged as important for this year's competition. The omni wheel system is good for maneuvering and strength, but the low-set nature of it would interfere with scoring in the competition. The tracks are good for strength and base durability, but the competition doesn't necessarily emphasize those characteristics. The size, manueverability, and low center of gravity, of Mecanum Wheels all complement this years competition. The high altitude of the wheels will allow us to go over the scoring balls, perhaps having some form of collection underneath. The extrusion-based structure gives more ease-of-access and stability compared to our previous Tetrix-centered versions.

Adding Blog Features

05 Oct 2016
Adding Blog Features By Ethan

Task: Add Cool and New Blog Features

I remember, vaguely, that someone on our team wanted to add a post counter for all the posts people appear in. And, today, I did it out of sheer boredom. And, here it is.

{% assign eh = 1 %}
{% assign dc = 1 %}
{% assign ed = 1 %}
{% assign or = 1 %}
{% assign js = 1 %}
{% assign cr = 1 %}
{% assign dp = 1 %}
{% assign mv = 1 %}
{% assign tv = 1 %}
{% assign jc = 1 %}
{% assign inc = 1 %}
{% for post in site.posts %}
  {% for name in post.rollcall %}
    {% if name == "Ethan" %}
      {% assign eh = eh | plus: 1 %}
    {% endif %}
    {% if name == "Dylan" %}
      {% assign dc = dc | plus: 1 %}
    {% endif %}
    {% if name == "Evan" %}
      {% assign ed = ed | plus: 1 %}
    {% endif %}
    {% if name == "Omar" %}
      {% assign or = or | plus: 1 %}
    {% endif %}
    {% if name == "Jayesh" %}
      {% assign js = js | plus: 1 %}
    {% endif %}
    {% if name == "Lin" %}
      {% assign cr = cr | plus: 1 %}     {% endif %}
    {% if name == "Darshan" %}
      {% assign dp = dp | plus: 1 %}
    {% endif %}
    {% if name == "Max" %}
      {% assign mv = mv | plus: 1 %}
    {% endif %}
    {% if name == "Tycho" %}
      {% assign tv = tv | plus: 1 %}
    {% endif %}
    {% if name == "Janavi" %}
      {% assign jc = jc | plus: 1 %}
    {% endif %}
  {% endfor %}
  {% assign inc = inc | plus: 1 %}
{% endfor %}
<ul>
  <li> Dylan Chorley - in {{dc}} posts</li>
  <li> Evan Daane - in {{ed}} posts</li>
  <li> Ethan Helfman - in {{eh}} posts</li>
  <li> Omar Ramirez - in {{or}} posts</li>
  <li> Lin Rogers - in {{cr}} posts</li>
  <li> Jayesh Sharma - in {{js}} posts</li>
  <li> Darshan Patel - in {{dp}} posts</li>
  <li> Maximillian Virani - in {{mv}} posts</li>
  <li> Tycho Virani - in {{tv}} posts</li>
  <li> Janavi Chadha - in {{jc}} posts</li>
</ul>

Now, this is not obviously the best code, there's probably a more efficient way than creating one variable per person. But, it works.
We've been making improvements on the site since the season began - changing the theme, Lin's commits that updated the blog for the new season, and purging old member bios from the team, just like how Stalin purged political dissidents from pictures and sent them to gulags.

Edit: We now have a Iron Reign stats page! We have spent a solid two hours debugging this so please appreciate it. We addded Austin, and cumulative personhours for team members and Iron Reign as a whole.

Reflections

We still need to work on the blog. At least for my computer, it takes a long time to load the actual site as it loads every single post made, so I'd like to add pagination. As well, I'd personally want to add a second theme for very easy readability, something like this.

2016-2017 Robot

15 Oct 2016
2016-2017 Robot By Ethan, Omar, Jayesh, Evan, Tycho, and Max

Task: To build the robot for the 2016-2017 season

As much as we love our robot from last season, Geb, we need a robot that is better able to fit the season's challenges. Our needs for this year are:

  • Manuverable and fast
  • Able to play defensively
  • Can support attachments such as an intake system
For manuverability, we decided to use mecanum wheels.

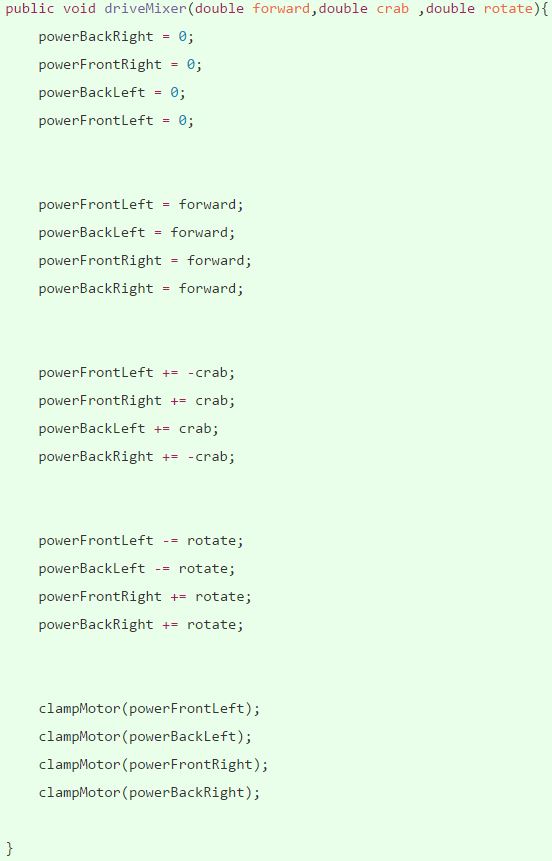
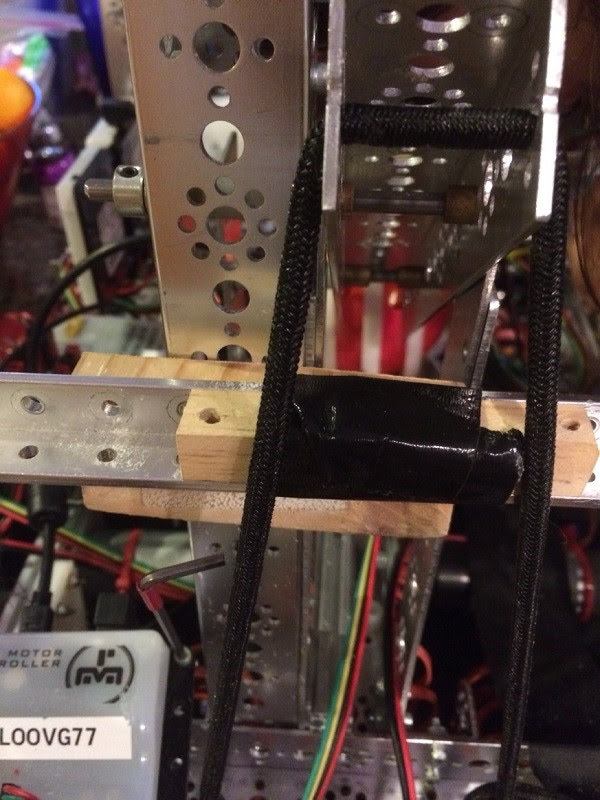
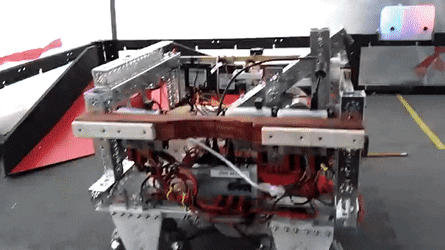
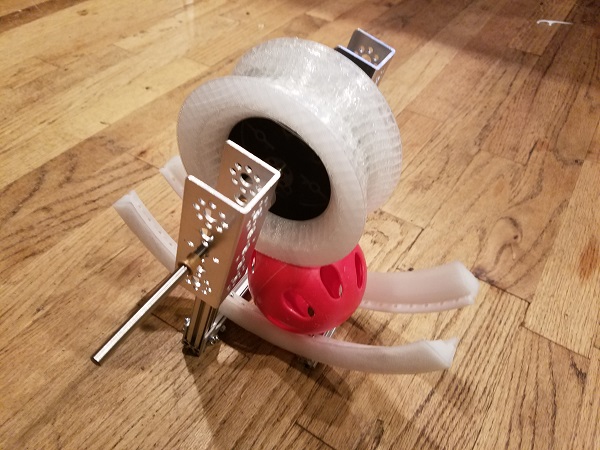
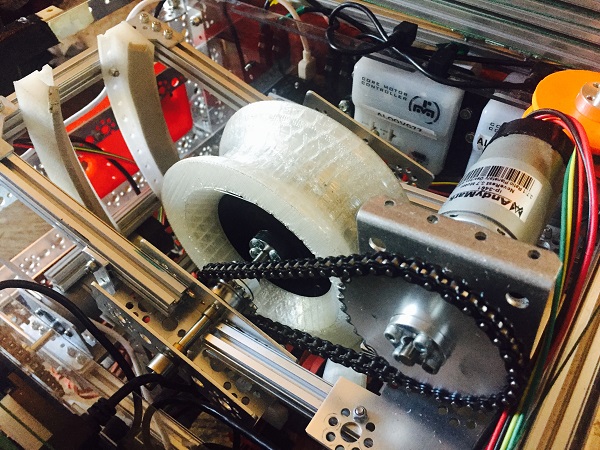
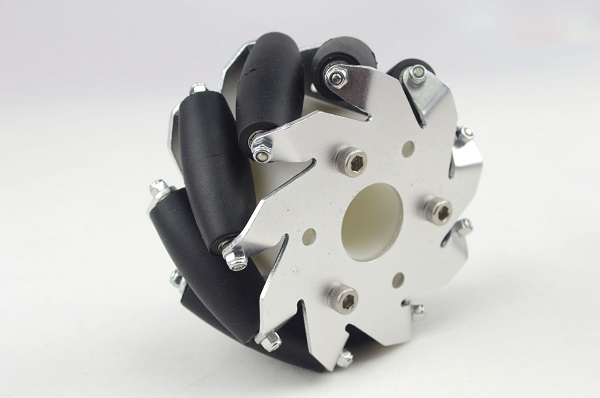
The cool thing about these wheels is that they enable you to strafe side to side, instead of turning. However, they do require different coding than our normal wheels.


To play defensively against other robots, our robot must be decently sized without falling into the same trap of last year, where are robot barely fit into the sizing limits, and in one tournament, did not at all. As well, it must be heavy enough to not be pushed out of the way by other robots, especially due to our strategy this year (blog post on that later).

Finally, our robot must support attachments. Currently, we are considering a launcher, and intake system, a circulation system, and a yoga ball-lifter. And, to accommodate all of these attachments, our basic frame is a re-enforced square frame.

Experimenting with a Mecanum wheel chassis! #ftcrobotics #omgrobots

A photo posted by Iron Reign Robotics FTC (@team6832) on


However, we are still experiencing problems, such as our chain falling off due to the supports moving toward each other. As well, we probably need to find a better place to put our motor controller and battery.

Reflections

We need to get our robot effectively finished within the next month if we are to go to the Arkansas tournament. As well, we need to add supports to our robot to stop the chain issue. Within the next two weeks, we should have made one or two attachments.

Programming our New Robot

15 Oct 2016
Programming our New Robot By Tycho, Lin, Ethan, and Jayesh

Task: Program our new mecanum wheel driving platform

Now that our new robot has been built with a mecanum wheel platform, we can start write our drive code and figure out how to make our robot preform three basic motions: forwards and backwards, side-to-side and to rotate. We decided that, in order to get the best understanding of our robot, how it moves and our code, that we would try to write our drive code through trial and error. However, we did reference some guides written by other various FTC and FRC teams if we got stuck on something and needed to figure out where to start in solving the problem.

Reflections

In order to drive our mecanum wheels properly, we need to first discuss how each wheel is placed on the robot, and also how each wheel needs to move in respect to the others in order move in a certain direction. Each wheel has small rollers that point 45 degrees off of the larger wheel itself. In order to properly set up mecanum wheels, the rollers on each wheel have to point towards the center of the robot.

This is important, because if these wheels are not pointing in the proper direction, then the rollers will begin to fight against each other, causing strange driving patterns that aren't very useful. We learned this the hard way, because when reconstructing the wheel mounts, the positions of two wheels on robot were flipped, causing the robot to drive in circles when we tried to drive sideways.

The main reason we decided to go with mecanum wheels is because they open so many different ways to navigate the field. Robots that properly use mecanum wheels can not only go forwards, backwards and turn, but they can also make a robot move side to side. These three types of movement can be mixed with each other to do even cooler things like move in diagonals or even strafe, which is when a robot moves in an arc while moving sideways. Of course, we cannot use mecanum wheels to their full potential if we do not first understand the first three basic types of movement. Driving forwards and backwards is pretty simple, and it's the same as any other robot; all of the wheels have to move in the same direction. Turning also remains unchanged from other platforms; the left side of the robot has to move one way, and the right side of the robot has to move the other.

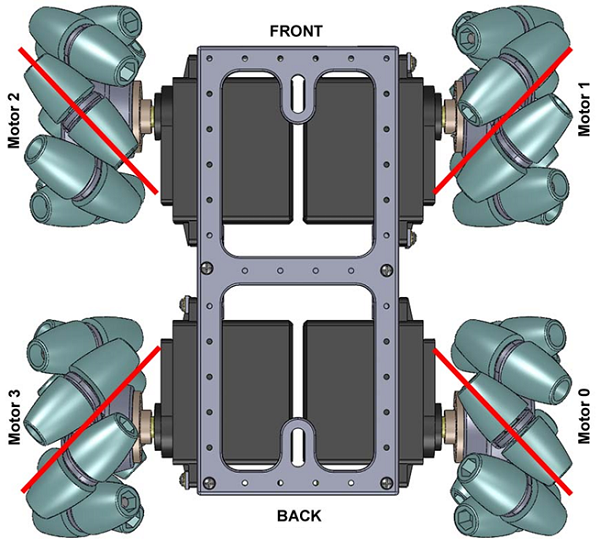
However, moving side to side is not really intuitive compared to the others. In order to move side to side, the wheels on either side have to move opposite of each other. For example, if I wanted to, from a top-down perspective, drive to the right, the wheels on the left side of the robot would have to drive away from each other, while the wheels on the right side of the robot would have to drive towards each other. The rollers start spinning away from the center and to the right on the left side of the robot, or towards the center and to the right for the right side of the robot. The forwards and backwards components of the wheels and the rollers cancel each other out, and the robot moves to the right.

Travis Open House

18 Oct 2016
Travis Open House By Ethan, Max, Tycho, Lin, Darshan, Jayesh, and Evan

Task: To talk to prospective SEM students about robotics

Every year W.B. Travis, a 4-8 has an open house for magnet schools to attend and convince students that $school1 is better than $school2. And, since it is Iron Reign's former school, we attend and try to pull students SEM. We present to about 5 groups and field questions from parents.

Unsurprisingly, we ran into issues, just like we always do. First, our chain kept on falling off of our new robot as we had forgotten to re-enforce the motor and wheel mounts. So, while our robot was still impressive, it was a bit disappointing. Second, we had our color-following robot, but we had forgotten the controller phone. Despite all this, Jayesh gave a great presentation to the prospective freshmen.

Reflections

We really need to amp our presenting game up - our robots always break down in some unexpected way and makes our presentation a bit underwhelming. However, this does help, as we know what to fix for an actual competition. In the future, it would help to test our robots a bit more before presenting.

General Organization Progress

22 Oct 2016
General Organization Progress By Lin and Janavi

Task: Reduce clutter from summer

We made real progress in sorting the good and dead batteries after UIL, and we've streamlined the charging process. The phones are harder to charge because their cords can disconnect without warning, and they slide around more. If we don't want to waste time in competition, it's important we make the system easy to use and reliable. Janavi and I worked on Powerpole-ing the last few batteries so we could test and charge them, and I made something like a file cabinet for the phones to rest in.

Reflections

The battery box already has some internal organization, charged batteries in a separate box, to-be-charged in the main section. The phones seem like they'd be easy to keep at maximum, but we've noticed that their cords aren't as reliable, even if we have multiple. Stacking the phones works to keep them charging in a smaller space, but if one in the middle disconnects we can't tell which. Then we have to reconnect each one while listening for a disconnect tone to sound. I used some extra prototyping cardboard to make a row of slots for the phones so we could charge them without them affecting each other. Hopefully this will survive the travel stress and

Need for ZTE Speed - The Movie - The Game

22 Oct 2016
Need for ZTE Speed - The Movie - The Game By Max

Task: Make a case for the ZTE Speed controlling the robot

While we are still in the early stages of design and it's not wise to make a permanent decision about where the robot's controlling phone will be, we can't let it float freely around the robot like a brain in a jar for much longer or it'll start getting caught in the developing systems. Normally, we could solve this easily by drilling a few holes in an off-the-shelf phone case and bolting it to the robot, but both the robot's design and the phone's code are constantly changing, so this would be far too permanent. We decided that the best way to house the phone would be a custom-made case with plenty of bolt holes to make it easily mountable and removable as well as a front which can be taken off at any time so we can take out the phone to reprogram it without driving ourselves insane.

I decided to make the case a pair of 3D-printed parts: a sturdy base made of t-glase which can be bolted to the robot and can easily socket the phone, and a flexible nylon cover plate which is kept in place by tabs which wrap around the base component but can be pulled out of the way when the phone needs to be put in or taken out.

Reflections

It took a few iterations before we printed the pieces, but the system as a whole is working smoothly. The phone is easy to replace and so far we haven't seen the cover come off once while the robot was driving. The only forseeable issue is with the tabs. Although they are flexible enough for our purposes, they are thin enough that they can be broken if bent too far. Since the face plates don't take too long to print and the 3 tabs left over after one breaks are still entirely capable of holding the phone in anyways, this shouldn't be too much of an issue, but it's still something to keep in mind for the future.

Applying for Grants

23 Oct 2016
Applying for Grants By Charlotte and Evan

Task: Applying for Grants

As the season begins, we have started to apply for grants. Grants are important to us because 68% of students in our home school receive free-or-reduced lunch, and we are underfunded by the district. It is our responsibility to seek the money required for our team to thrive.
Here is an excerpt from a letter we sent to a local business:

"Unfortunately time is money and the time it takes us to contribute to each of these events costs us dollars we don’t have. We all love teaching young children who are interested in robotics and technology and we hope what they receive is beyond value. But we also need to raise our competitive game and new parts cost money. When jerry rigging and reusing parts unsuited for the job, we waste time that could be used to make more progress and continue the advancement of our robot. As we continuously refine our design, new parts are needed and some need to be replaced as we strive for an efficient and reliable entry. The other piece of the financial puzzle is transportation costs. This year we plan to take part in multiple competitions including out-of-state competitions in order to deepen our competitive potential and improve our chances of advancing to the next level. Competition expenses beyond the standard local track are some of the hardest expenses to fund."

Reflections

In the future, we wish to reach out to more businesses for grant opportunities. We have already applied to the FTC grant and others, and we have set up a Paypal page where anyone can donate any amount of money. For example, you can donate

Launching Mechanisms

26 Oct 2016
Launching Mechanisms By Ethan

Task: To build a launching mechanism for the particles

For the 2016-2017 season, particle scoring is really important. During autonomous, balls that are launched into the center vortex earn 15 points each, and balls that are launched into the center vortex earn 5 points. If done quickly enough, the particle scoring can negate most of the advantages another team has - just 8 particles scored during the driver-controlled period is equivalent to scoring all 4 beacons. With a good scoring mechanism, the only thing that your team must contend with is the other team scoring autonomous beacons and/or moving the cap ball off of the field.

So, we must seriously consider all of our launching options. We narrowed our options down quickly:

  • Slingshot - Easy to make, but wouldn't hold up
  • Air launcher/Pneumatics - With our team, bad idea waiting to happen
  • Crossbow - Dangerous, but accurate.
  • Flywheel launcher - Accurate, requires least maintenance, but huge battery load
  • Catapult - Less accurate, but simple and powerful
Of these options, we narrowed it down to the Flywheel and Catapult

Flywheel

Above is an example of a fully functional flywheel. The pros of that design are that it is efficient, accurate, and requires little upkeep. On the other hand, it needs at least 2 motors unless someone is willing to do gear witchcraft. As well, two extra motors will drain the battery (bigly), as we learned from last year's mountain climber. Finally, it can take up quite a bit of space on the robot and weigh it down a lot.
Also, my initial model of it did not function well.

Catapult

We had trouble deciding on a catapult design. Initially, we were considering a more complicated flipper design, but after seeing our sister team's struggle with their design, we decided on a simpler, bungee cord design. The pros of this design are accuracy, simplicity, and strength, but the cons are that it isn't *as* accurate and that the elastic band will need to be replaced.

The coolest thing about this design is that it can be simulated before I change anything, using a catapult simulator. A sample of our catapult can be found here.

Reflections

This add-on is the first of many that we must make to prepare for competition. Next, on the build list, we need to create a capping attachment and intake system. In the future, we should probably speed up our development process if we are to head to the Arkansas regional tournament.

Ready the Artillery

29 Oct 2016
Ready the Artillery By Max

Task: Design a bowl for our upcoming catapult system

We've been experimenting with catapult systems for a little while now, but we're still sorely lacking one of the core ingredients of any catapult system: the ability to throw things. I mean, technically we're lacking the ability to hold what we're trying to throw, but it's the same effect.

In any case, it's an issue we have to deal with, and our solution is good ol' nylon. I went through a few designs for a bowl to hold balls, and the one we're using is pretty much a semicircular shell with a handle which mounts to the arm of the catapult and plenty of holes to lower the weight while keeping it sturdy.

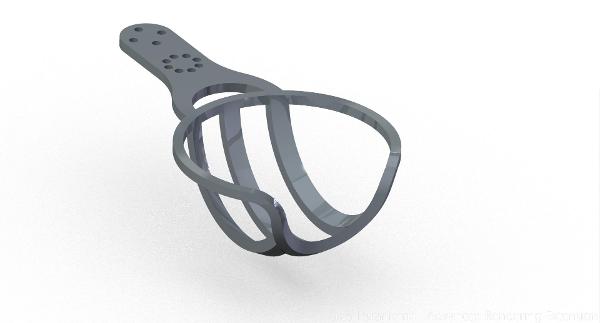
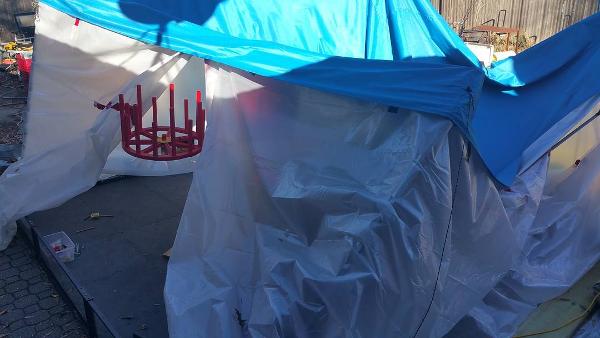
(herecomedatbowl.jpg)

Reflections

The bowl is a great fit for the ball and doesn't seem to interfere with the strength of the catapult, but there are still two issues which we can't address yet.

Firstly, we haven't gotten a loading mechanism planned out yet. We can make the catapult as strong and reliable as we want, but beyond the first ball we're allowed to load for autonomous, it won't do us any good until the robot can actually take balls from the floor and load them into the bowl. That might not seem very pertinent to the design of the bowl, but since it's the only physical interface between the loading mechanism and the catapult, it'll be the first thing to change if the two don't fit together on the first try.

The second issue is just that cleaning out the printed model is an utter pain. Again, this is no reason to change the model right now (and it probably won't be one later on, either), but since we're likely to have at least one more version in order to solve whatever issues we encounter while developing the loading mechanism, there's at least a 90% chance that another catapult bowl will need to have its support structure gouged out over the course of an hour. I just feel sorry for the poor bugger who has to do it.

Yeah, it's probably gonna be me.

Stabilizing Our Driving Base

29 Oct 2016
Stabilizing Our Driving Base By Jayesh, Omar, Max, and Darshan

Task: Stablize Meccanum wheel base so the driving is more stable and consistent

Our Meccanum wheel base idea started off on a shaky note. While we had a good amount of success in the tass we wanted to complete, like driving right or let without turning the entire robot, including the basic driving functions. However, as we went on with testing, we found that over time, the force the meccanum wheels were exerting on the chain was actually causing the motors driving the chains to come inwards. This was thereby loosening the chain and weakening their effect on the driving chassis. To fix this, we decided to mount angled beams between the motor and Meccanum wheels to stabilize and prevent the motion. We then further strengthened the system by 3D printing trapezoid-shaped mounts that have more surface area and strength to stabilize the system.

Reflections

As we go on improving the robot, we keep finding that our new designs have an incredible amount of errors and small bugs that need to be looked at before moving on to the next big design. Now that we have a stable and relatively reliable driving base, we can now focus our attentions to the scoring mechanism. Through our redesigns of the motor stabalizers we have found the use of testing on both the ground and in stationary conditions. We need to design a new mount to make stationary testing more efficient. This will especially be important for the testing we'll have to commit to for our scoring mechanism. (which will be discussed in a future post)

Launching Mechanisms Pt. 2

31 Oct 2016
Launching Mechanisms Pt. 2 By Ethan

Task: To improve upon launching mechanism designs

Catapult

First and foremost, we now have one completely functional, terrifying, catapult. The motor mechanism is cannibalized from our sister team's attempt at a catapult, which broke apart on testing.


Flywheel
So, while we don't have a functional flywheel as of yet, we have done the math in order to get it up and working on the first try.

For reference, we need to launch the ball ~1 meter, the frequency of the motor is 2.53 s^-1, and the radius of our gear is 2.65cm.
velocityfinal^2 = velocityinitial^2 + 2*acceleration*change in y
velocityfinal = sqrt(2*9.8m/s^2*1m)
velocityfinal = sqrt(19.6m^2/s^2)
velocityfinal = 4.427 m/s

actual final velocity = 4.427 * 1.25 = 5.534m/s
actual final velocity = 2*pi*radius*frequency
(5.534m/s)/(2*pi*2.53s^-1) = .348m

gear ratio = gear1radius/gear2radius = 2.65/.348 = 1:7.615
However, for simplicity, our needed gear ratio is 1:8.

Reflections

We should advance in building our attachments - if we go to Arkansas, we have <6 practices to go. And, from now on, we need to do the math behind them so we know we're doing them right.

The Robot is a Nautilus Now

02 Nov 2016
The Robot is a Nautilus Now By Max

Task: Make a conveyor shaft to guide particles to the catapult

We’ve thoroughly proven that the tread of rubber bands is an effective method of ball collection, but as of yet it can only move the balls along the ground. We’ll need a way to move them upwards to the catapult bowl’s level. While we could use another motor to push the particles up and over the belt, it could get caught and we’d rather not take up another motor port. We decided to instead make a semicircular tube to guide the balls, with no motors of its own, but instead simply keeping each ball in contact with the center belt as it turns around to move back to the front of the robot.

After measuring how large the tube would have to be to house the ball, it was clear that it couldn’t be printed in one part (not that I would have if I could - the infill would be a nightmare to remove), so instead I made a model for a segment of it which can be printed several times and then bolted together at a few built-in sockets. Each segment accounts for 30 degrees of the 180-degree arc we plan to build. A segment can be seen below.

Reflections

The model prints well, connects easily, and sockets the particles perfectly, but it lacks the friction required to keep them from spinning in place instead of moving up the tube. We were able to solve this by applying a stripe of memory foam to the inside of the tube with double-sided tape.

New Worlds Cities In Space

04 Nov 2016
New Worlds Cities In Space By Lin, Jayesh, Omar, and Darshan

Task: Obtain knowledge and share work done on Moon base project

A contigent from Iron Reign participated in a space competition at the NewWorlds Conference. The idea was to form a interstellar base to self-maintain and extend humankind's reach into the universe. After winning the previous year's competition with a Mars base, the team did a sort of prequel, committing to a Moon base. Involving writing a 21 page research paper, developing a minecraft-modded map, and work in Google Sketchup, the team presented to a group of Space researchers, genetic scientists, and privately-funded space companies over our work. We recieved 1st place for our work and garnered a lot of interest in STEM and space.

Reflections

The convention allowed us to present both to the aforementioned specialists and children who took a field trip to come to the convention. These children were especially attracted by the minecraft design. We led them through walking in the base and testing out our designs. We were able to garner a lot of interest of their concept of space and STEM was. When the judges came to our area, we mentioned how the topics we learned in SEM and in robotics helped us to finish a lot of the fact-checking for the base. In the end there was a lot of interest and praise for our work, even going as far as to convince a researcher to ask in running a molecular biology summer camp at our school. We're excited to build off our success at the competition and use it to help us in FTC as well.

Meeting Log

06 Nov 2016
Meeting Log November 06, 2016 By Max, Tycho, Jayesh, Darshan, Ethan, Evan, and Janavi

Meeting Log November 06, 2016

We've been blogging/journalling at the sub-team level, which allows us to share our work at a deeper level on specific subjects. This ends up creating a need to have many posts in a single practice. That's great for our journal, but we also end up failing to document some of our sub-team work because we can't find enough time to write up every break-out project. We are also regularly missing out on documenting a lot of our organizational work, like the planning session at the beginning of practice and the list of tasks we assign ourselves. So from now on we will be adding a practice log for each meeting - starting it as an open template on our main shared computer and just asking team members to log their start-stop times there. Publish right at the end of practice. This is meant to be a light-weight log - it doesn't need great writing. Members, add your time to person-hours in this post only for planning time plus any time you worked that will not be captured in a detail post. This will be the first such post.

Today's Meet Objectives

Organization / Documentation / Competition Prep

  • Review Journal - not started
  • Review Robot Status - completed

Software

  • Fix pose class - import from last year is incomplete and broke code - completed
  • Calibrate forward and crabbing motions of the robot - not started
  • Turn current teleop mecanum mixing into a method that can be used across teleop and autonomous - completed
  • Begin Autonomous motion sequences - not started

Build / Modelling

  • Add outside collectors to collector system - minor progress
  • Begin modelling the full robot assembly - not started

Service / Outreach

  • Blog about SEM open house - TBD, delegated for homework

Today's Work Log

Team MembersTaskStart TimeDuration
AllPlanning Meeting2:10pm.25
TychoFix pose class2:30pm1
MaxCleanup and mount catapult bowl4:001
Tycho, JanaviMecanum mixing method3:45.5
Tycho, JanaviMethod to prevent repeated inputs3:30.25
Ethan,EvanUnboxing video Textix gift3:30.5
Darshan, Ethan, MaxCatapult Base2:451.25
EvanDesign sizing box5:001
Max, JayeshTeach Jayesh Creo basics3:00.5

Parasyte

06 Nov 2016
Parasyte By Jayesh, Omar, Darshan, Lin, and Max

Task: Design a collector for the balls

We've spent the last few practies creating a ball collector. The idea was to have our track with the gripping rubber bands reach from the bottom of the robot to our 3D designed ramp. The path would guide the balls to a higher position on our robot to the launching mechanism. We needed to adjust the correct orientation of the support beams guiding the balls, needing to drill new holes and adjust beam lengths.

Reflections

There have been a lot of adjustments we have had to made to the this tread-based system. Starting from an eyeball test of the length, we had to eventuall lengthen the whole tread to fit the whole system. With our length being about finalized, and our entire path about done, We are about ready to attach our launching mechanism and start adjusting the scoring mechanism.

A Thank-You to Tetrix

12 Nov 2016
A Thank-You to Tetrix By Ethan and Evan

Task: To create a thank-you video to Pitsco

We entered a contest to win a pack of Tetrix parts on Twitter, and we won! You can also enter the contest by following these instructions

So, as a thank-you to them, we made this:

Mecanum Driving

13 Nov 2016
Mecanum Driving By Tycho

Task: Code driving under mecanum wheels

Today, I wrote the whole code for controlling our mecanum wheels. It is entirely fron scratch, and works perfectly right off the bat. This code allows us to strafe, move backwards and forwards, and rotate, in one method.

Reflections

We still have a lot of coding to do, as we're currently working on a particle-launching system. As well, we need to consider autonomous soon.

Nov. 21 Scrimmage

21 Nov 2016
Nov. 21 Scrimmage Written, but not attended by Ethan By Omar, Darshan, Jayesh, Max, Tycho, Lin, Janavi, Austin, and Ethan

Task: To test our robot and gauge other team's progress

First, the team arrived at the Virani's house and boarded the MXP for a Arkansas dry run. We learned that it's pretty bumpy for passengers when you're driving on the highway, making the experience a bit uncomfortable. We'll need to fix that for the 8-hour drive to Arkansas.

When we arrived at the scrimmage, it was laid out like a normal tournament, though there were only nine teams to compete against. The matches were laid out so that each team competed five times, but only four of those five matches counted towards your actual score. During the first match, things were looking up. Our catapult and intake system were looking great, we had scored two or three balls, and our driving was pretty nice. We ended up winning that match. Then, everything went downhill. First, we had a issue with a loose chain, which we were able to fix. After that, however, our robot's catapult jammed so we had no useful way to score. This led to us losing our other three matches.

Despite all this, we ended up 6th place out of nine teams, which isn't *horrible*. We were also picked for an alliance.

Reflections

There are teams very ahead of us, so we need to step our game up for Arkansas. Our next goals, in order, should be to fix the chain system permanently, stop the catapult from jamming, add the beacon presser, and add the yoga-ball lifter. However, our collection system was really nice and worked >95% of the time. The only problem with it was that balls occasionally got stuck on top of the robot delivering to the catapult.

Intake System Improvements

21 Nov 2016
Intake System Improvements By Lin and Janavi

Task: Replace rubber bands with smaller versions and add wider intake area

New intake area is wider than before


At the Scrimmage we noticed that the rubber bands would get tangled as they rubbed against the underside of the catapult bowl, and so didn't reach as far down at the bottom. We untangled them before each match but decided to test out the smaller ones when we had the chance at practice. We were planning on adding a wider area for intake with some circles of treads and rubber bands, but with the long rubber bands they just got completely tangled in each other. So this practice we replaced the long rubber bands with the shorter versions and looked at differences

Reflections

It took a little while to physically pull out and replace each band, but the rubber bands we use are stiff enough that they can be pulled thin enough to slip in without getting twisted up. The single conveyor with the smaller rubber bands wasn't any noticeably worse than the same conveyor with longer ones, and our load rate stayed pretty much the same. We then added the smaller side brushes/spinners on that axle. Originally the longer rubber bands tangled up and threatened to break the belt, but this made it easier for Tycho and Omar to score. The added wheels on the axle make the intake area almost as large as the robot, stretching from wheel to wheel.

Meeting Log

22 Nov 2016
Meeting Log November 22, 2016 By Lin, Evan, Ethan, Darshan, Tycho, and Omar

Meeting Log November 22, 2016

Main focus for the day is fixing the problems encountered at the scrimmage and making autonomous progress.

Today's Meet Objectives

Organization / Documentation / Competition Prep

  • Review Journal
  • Pre-Match checklist
  • Continue Presentation

Software

  • Autonomously score
  • Put collection system in same class as flinger

Build / Modelling

  • Mount new particle bowl
  • Build button pusher

Service / Outreach

  • Update connection totals

Today's Work Log

Team MembersTaskStart TimeDuration
AllPlanning Meeting2:10pm.25
EthanCatapult size restraint2:301
Omar, DarshanButton press2:303
LinPre-Match Checkist2:30.5
TychoAutonomous scoring3:001
EvanPresentation3:003
Ethan, LinNew particle bowl3:30.25
TychoCollection system class4:001
Lin, EvanUpdate service totals5:001

Catapult Unfixes

22 Nov 2016
Catapult Unfixes By Ethan

Task: To bring the catapult within size limits and improve it

What Actually Happened: Abject failures

So, the original catapult, when not stuck, performed pretty well at the scrimmage. However, since we opted not to measure our robot at the scrimmage, we didn't realize that our robot was not within the FTC size limits. When measured after the fact, it was 18x19x20 in x, y, and z axes respectively, due to the catapult's position on the robot. To rectify this, we decided to cut the catapult down, and add a new ball-scoop while we were at it.

So, we cut down the catapult arm, and that's where the critical error occurred. I forgot how a lever lever-ed, and completely removed the pull-down part of the lever. And, since I didn't check it afterwards, I continued to make modifications, cutting down the top to 18 inches, and reattching it to the robot. Also, these modifications prevented testing of the robot.

And finally, in the moment of truth, the robot failed to work.

Reflections

In the future, I should probably have someone check on my work to make sure I'm not fouling everything up. As well, I probably should try to not make modifications the week before the tournament.

Autonomous Setup Options

23 Nov 2016
Autonomous Setup Options By Tycho

Task: Create a basic autonomous

Autonomous is one of the things that we tend to be weak on every year, and this year, we really want to get to super-regionals. So, to start off this year's autonomous, we first mapped out a potential path for the robot on the field. We then followed up with programming, using our previous methods like driveForward and driveCrab. So now, we have a basic autonomous program in which we can push the cap ball and attempt to shoot the vortex.

Reflections

We still have a long way to go in working on our autonomous - we need to be more accurate in shooting the vortex, we would like to hit the beacons, and we want to get parking points as well.

Catapult Upgrades

23 Nov 2016
Catapult Upgrades By Max

Get Nostradamus on the horn, there’s a new prophet in town.

Task: Imbue the catapult bowl with infinite power

As I predicted in the article about the first version of the catapult bowl, it’s gonna need a rework. There’s enough room for the catapult system and the conveyor system to fit together on the robot, but the lip of the bowl is too high for a ball to roll into the slot. This is a tough issue to solve: we’ll have to slice a chunk out of the hemisphere of the bowl, but doing so will make a bunch of sharp corners in the area of the catapult which is closest to the rubber bands, and the potential repercussions of the belt and catapult getting snagged on each other in the middle of a competition are catastrophic. I’ve solved the problem as best I could with a very generous rounding over of the points left over after removing the section of the bowl which is blocking the balls.

Reflections

This has solved our problems in interfacing the two systems, but I’m a bit concerned that taking so much material out of the outer end of the bowl may affect the flight path of the particles by providing less resistance to the centrifugal momentum of the ball as it accelerates. We won’t go back to the original bowl based on that knowledge, but it’s still an important detail to keep in mind as we consider our options for scoring points.

Meeting Log

26 Nov 2016
Meeting Log November 26, 2016 By Ethan, Max, Tycho, Janavi, Darshan, Omar, and Evan

Meeting Log November 26, 2016

Today marks one week until our Arkansas Tournament. God help us all.

Today's Meet Objectives

Organization / Documentation / Competition Prep

  • Review Journal
  • Work on Presentation
  • Do Blog Posts

Software

  • Autonomous
  • Testing Code

Build / Modelling

  • Finish 2nd Level
  • Improve Catapult

Service / Outreach

  • Blog

Today's Work Log

Team MembersTaskStart TimeDuration
AllPlanning Meeting2:10pm.25
Omar, Darshan, EvanField Build2:002
Tycho, JanaviAutonomous2:004
EthanHousekeeping Duties2:004
MaxRobot Improvements2:004

Final Catapult

27 Nov 2016
Final Catapult By Ethan, Evan, Omar, and Jayesh

Task: Finish up the catapult before Arkansas

Today marks six days until Doomsday (AKA Little Home, Arkansas), so we needed to finalize everything. For the catapult, Jayesh and Omar fixed my catapult "fixes". However, with the new fixes, the catapult was more powerful, and required recalibration. To adjust to the new fixes, we removed the old stop-mechanism, and replaced it with a wooden one that stops it on the 2nd level of the robot.

As a result of these changes, the arc of the catapult is more horizontal while preserving the height of the launch. This actually gives us a slight advantage in where we can fire the balls from. The only downside of the new design is that it tends a bit to the left.

Reflections

The catapult is good for this tournament, but we need to pursue alternate designs, such as the flywheel in the future. We should also make better prototypes to test.

Robot Frame and Rewiring

28 Nov 2016
Robot Frame and Rewiring By Jayesh, Omar, and Evan

Task: Build a frame to increase available surface area on robot to rewire current configuration

The wiring, which had been on the robot, had been a constant issue. The wiring tangled, interfered with the scoring mechanism, and led to some inefficiencies in electrical output. In order to increase the available space to reconfigure the inner workings of the robot, we built a second testrix layer, which also conveniently serves as a handle.

Reflections

The new level on the robot has given us a lot of much-needed flexibility for arranging the different parts. Now the core of our robot isn't a jungle of tangled cords. As we continued building the layer, we found it could be used for various other purposes besides simply space control. The back layer simultaneously stabilizes our scoring mechanism, allowing us to control our shot more. Besides the modules, the phone and power switch are also attached to the upper layer for ease-of-access. As we only made layers for the front and back, the sides of the robot are left open, nonetheless more free without the wires, for our cap ball lift (which is currently in progress, more on it in future posts).

Designing Button Pusher

01 Dec 2016
Designing Button Pusher By Darshan and Omar

Task: Design potential beacon scoring mechanism

Up to this point, we hadn't given much attention to a beacon scoring mechanism that we could use in both autonomous and tele-op. At the scrimmage we learned that scoring the beacons was almost vital to winning the match, and we couldn't do that. We rigged up a short u-channel on a plate and attached it to our robot, hoping we could just ram into the wall and it would work. It didn't. We started designing potential button pushers. We figured a servo would have enough power and saw a few robots using either a large flat plate or some type of wheel to score the beacons. We thought that a hard-foam wheel would work best, but aren't entirely sure how we would mount it with our limited space, so we'll have to see what best fits our needs and capabilities.

Reflections

Whatever our solution is for this problem, with our first qualifier really soon, we have to come up with it quickly. We realize that if we plan to be a contender for the top seed, we need to be a consistent beacon scorer.

Combining TeleOp and Autonomous

01 Dec 2016
Combining TeleOp and Autonomous By Tycho

Task: Combine TeleOp and Autonomous code

Today, I combined the autonomous and teleop so that we can demo both more easily. As well, during testing, we now can switch between them seamlessly so that our testing is power. The most important part of this code is that we can configure the autonomous before we launch - telling the robot how many balls we have, how many to shoot, what side the robot is on, and other pertinent options.

Reflections

We still need more code and fixes - our robot keeps having random errors while launching. As well, we have intermittent lag.

Arkansas State Competition 2016

02 Dec 2016
Arkansas State Competition 2016 By Ethan, Evan, Lin, Janavi, Jayesh, Omar, Darshan, Max, and Tycho

Task: Compete in the 2016 Arkansas State Competition

This year, to give our team a better chance of going to super-regionals for the first time, we decided to enter the Arkansas regional. We were actually pretty far ahead compared to our last seasons. We had a finished robot, a working autonomous, and good drivers.

Upon arrival, we had to make some last minute changes to our robot in order to pass inspection, as it was too bumpy in the RV. So , we huddled in the school's band room and attached our side shields and team number, making it just in time for inspection. We set up our table for the competition as well.

Upon arriving to the hotel, we realized that we hadn't really practiced our presentation at all, so we had to hold a last minute session until 12. After that, a few team members fell asleep for the next day, but most boarded the RV and worked on the robot and autonomous until ~2 in the morning.

We woke up refreshed (totally), and went to the tournament. In order, we had: opening ceremony, the presentation, and then the four games. First, right before the presentation, we found that our robot, despite working the night before, now refused to accept any motor commands. This was due to the way our code handled controller events, so we had to change that last minute. Also, due to just having last minute practice in the presentation (and being tired), we didn't preform as well as we would have liked.

The Game

In the first match, we performed way better than we expected, and actually won the game. However, we discovered that our robot has a static issue due to the way the wheels slide, so we had to reboot it during the match.
In the second match, we lost. This was partially due to the static issue and partially due to the fact that we were paired with an inexperienced team. We helped show them the ropes, however, and saw a lot of the origins of our team in them. We wish them the best and hope they can progress.
In the third, fourth, and fifth match, we won all our matches, even though our static issue got worse. Our relatively consistent autonomous, paired with the beacon and ball scoring fared us well against our opponents. We need to build on these strengths, while also introducing end game flexibility with cap ball scoring.

We did not get picked for alliances, even though we were in 8th place with a 4-1 record. this was probably a knock on our scouting and relation building with the other teams. We'll make sure to build on that for future competitions.

Reflections

We had issues at the tournament due to static and scouting issues. The scouting issue was particularly bad due to these reasons:

  • Staying on the RV and not interacting with other teams
  • Alliance negotiations were started too late
  • Misjudging other teams

This tournament gave us valuable experience for the qualifiers we have coming up. We have now fixed the static and controller issues. We were also able to judge the progress of other teams and compare it to ours. By the time of the qualifier, we should have some advantages over the other teams.

Time to Skip Version 9

10 Dec 2016
Time to Skip Version 9 By Max

Task: Make some changes to the catapult bowl

The apocalypse is at hand.

Chaos reigns as the world is thrown into peril; whole nations are thrown into anarchy by the second; and the superpowers of the world, once bitter enemies, have no choice but to band together as a horrid product of our own hubris, a threat more devastating than any which mankind has ever before seen, appears to put a grisly end to humanity:

The catapult bowl is too floppy.

Cut to black. Text appears: VERSION 8.

So, we got a problem. And as the guy who does the bulk of the 3D modeling around here, I’ll be fixing it. In case you didn’t gather what that problem is from the intro sequence, the catapult bowl is a bit too flexible for our liking, which is causing a bit of inaccuracy. To remedy this, I’ve added some simple buttress-type structures to the underside of the bowl to put some more support on the thin section where it seems to be flexing the most.

Reflections

The supports are just what the bowl needed. It’s flexing far less, and there’s been a noticeable increase in the accuracy of the catapult since it’s been added. All in all, this was a box-office blockbuster.

See VERSION 8 starring Adam Sandler as Catapult Bowl this summer in DVD and IMAX.

Arkansas Analysis

10 Dec 2016
Arkansas Analysis By Lin, Omar, Darshan, Jayesh, Evan, Max, Tycho, Janavi, and Ethan

Task: Analyze what went wrong and right at Arkansas

We spent a good hour and a half analyzing what we needed to do differently at upcoming competitions, and how to better prepare in the upcoming school break.

Notes

Mechanical:

  • Anti static spray
  • Shorten wires and close wire ends
  • Stabilize USB connections to controllers
  • Cap Ball lift

Competition:

  • Driver Practice!!
  • Organize sub teams during competition
  • Scouting more and building connections
  • Stay aware and alert, no zoning out while in the pits especially
  • Line up robot based on tile mat seams
  • Control Award checklist done beforehand
  • RV shifts, no more than 1 onboard at a time

Presentation and Presence:

  • Mechanical demos
  • Videos of demos easily available if robot stops cooperating
  • Team costume and cart chariot
  • RV video PSA - Pay it Forward
  • Be more active on Twitter and link videos to judges
  • Have a fundraiser in the neighborhood

Reflections

The Arkansas competition taught us a lot about the system of success for this years competition. We are ahead in terms of progress relative to other years, now we can focus on scoring elements like the cap ball, along with the presentation.

QD Academy Scrimmage

18 Dec 2016
QD Academy Scrimmage By Ethan, Evan, Tycho, Max, Darshan, Lin, and Omar

Task: To test our robot in a tournament setting

On Dec. 18, we came to QD Academy to test our robot under tournament conditions. At Arkansas, we had frequent static issues on the mats provided, and we had trouble recreating the static in practice to prevent it, so we wanted to try to find a cure for it. As well, we've been improving our autonomous code, so we were excited to try that.

We did well at the scrimmage, compared to the teams that we went against (4-1). We were lucky to already have been to a tournament - and a regional at that, so we ended up placing 3rd, and our sister team placed 5th. However, we still ran into new, and worse, issues. First, the static issue reemerged, and became worse than when we were at the Arkansas tournament. As well, when we bumped into the beacons with enough speed, our robot would turn off, and we would have to completely reboot the robot at the end of the match.

To solve the static issue we had bought Staticide(TM), but we forgot to bring it, so we have no idea if it works for our robot or not. We tried rubbing down our robot with dryer sheets, but it just exacerbated the issue if it did anything at all. The beacon issue seemed also to be caused by the static discharge, but we haven't determined it conclusively yet.

Reflections

We scored a lot of points, but we need to optimize our autonomous for both sides to score even more. As well, we still need to solve the persistent static problem, as it will really harm us in January if it continues.

Beginning the build for the Cap Ball Trapper

24 Dec 2016
Beginning the build for the Cap Ball Trapper By Jayesh and Omar

Task: Give Deadshot flexibility in end game scoring by designing Cap ball launcher

One of the issues we saw in Arkansas was in the lack of flexibility we had in terms of the end game. We efficiently scored balls and beacons, but when our teammate for a specific match could do the same, we lost possible points scored. This led us to conclude that a Cap Ball Trapper, would be necessary for the sole purpose of flexibility. We focused on an extrusion-based system, based on a set from AndyMark. We've rigged up a pair of basic stairway systems, which will form the main lifting mechanism for the Cap Balls, now we have to figure out where to place them.

We followed the Youtube video above to figure out how everything was put together initially, and then expanded from there.

Reflections

The idea of flexibility is a luxury we can consider due to the progress made for the Arkansas competition. The idea is in scoring the maximum amount of points, regardless of the capabilities of our respective partners. The rigs themselves (although they do need some end covers so they don't fall apart) work fine, but we need to figure how it's going to fit into the general scheme of our robot. We have concluded that the rig will require two motors (we're at our limit; hooray traditions). The main goal in finishing this system is in figuring out both its deployment and placement.

Fixing Faulty Encoder

26 Dec 2016
Fixing Faulty Encoder By Tycho and Jayesh

Task: Fix a faulty encoder on our robot

This shows a test of our encoder issues. It might have been a month ago that we noticed a strange behavior in our autonomous code when the robot was moving forward at low speed. It would curve to the right when we were telling it to go straight. We probably would have noticed the problem earlier if we had any kind of subtlety in our driving. But we didn't, partly because the problem goes away when driving at full speed. We did suspect that the problem was in the encoder feedback of the front left drive wheel. In this video you can see how it ramps up to full speed much faster than the other motors. Here we are driving the robot with encoder PID active. But when driving backward, the motor/wheel behaves properly. This indicated to us that one channel of the encoder was working normally while the other was skipping ticks. But the problem could be in the encoder, the encoder cable or the motor controller. Since our motors take some time to change out and we were heading off to the Arkansas State Championship, we decided to simply turn off PID control. The problem goes away when we are simply driving the motors with open loop power levels - proving that the encoder is the culprit and that motor imbalance was not an issue. The problem with just turning of PID control is that we were still getting bad odometry since our method of calculating distance traveled is based on averaging the encoders across the four motors. So we had to adjust our target distances in autonomous based on trial and error instead of proper calculations.

Here we are trying to identify the source of our encoder issues. We swapped the encoder cable and and ports on the motor controller, but the problem stayed with the front left motor. That told us that it was the motor's encoder that was the issue. We confirmed through telemetry that the encoder was giving no ticks when driving forward, but worked fine in the reverse. So we replaced the whole motor and this time it sped up faster than the other motors in both directions. That really mystified us for a bit. Turns out the substitute motor had an encoder that was dead on both channels. What were the odds of that? We'd simply pulled a motor from our inventory and assumed it would be OK. But it must have been one we hadn't needed to be encoder controlled. We finally found a third motor, this time tested its encoder before throwing on the robot, and all is well now. We can now drive the robot under PID control and it drives as expected at various power levels. We need to re-calibrate our blended travel distances with the working encoder, but feel much better about our performance. We can even reliably use run to position commands if we want, though our navigation code doesn't require that.

This just shows the proper behavior of the robot after our encoder troubles were resolved:

Mapping Out Autonomous

30 Dec 2016
Mapping Out Autonomous By Janavi, Tycho, Omar, Evan, and Darshan

Task: Mapping Out Autonomous

To tell the robot how far to move forward we had to calculate our motors RPM. We did this by telling the robot move to 10 rotations forward and calculating how far it travelled. After he RPM we created a model field upon which we designed a set path for the robot during autonomous. One path for red and then one for blue. Both of these paths allowed the robot to shoot two balls and then push the beacon buttons.After testing this we realised that our alliance partner may be better or worse than us at shooting the balls. So we created a method that allowed us to push a,b, or x to change the number of times the catapult fired.

Reflections

We are constantly working to improve the design our Autonomous. Before this, while our autonomous may have worked. It didn't allow us to collaborate with our alliances to create the best path, stopping us from earning the most points possible. Now with these changes we can work together with our alliance partners to complement each others strengths and weaknesses, helping us earn more points. This will also encourage us to scout around and interact with other teams before and in-between the matches, letting us create a even more detailed scouting sheet.

Meeting Log

31 Dec 2016
Meeting Log December 31, 2016 By Ethan, Evan, Tycho, and Lin

Meeting Log December 31, 2016

Today's Meet Objectives

Organization / Documentation / Competition Prep

  • Blog Fixes

Software

  • Test autonomous changes

Build / Modelling

  • Add swinging arms to the robot

Today's Work Log

Team MembersTaskStart TimeDuration
AllPlanning Meeting2:10pm.25
TychoTest Autonomous2:004
LinBlog fixes/Cabling2:004
EthanSwinging Arms/Blog Fixes2:004
EvanSwinging Arms/Robot Fixes2:004

Tent Disassembly

07 Jan 2017
Tent Disassembly By Ethan, Omar, and Darshan

Task: Disassemble the tent covering our field

Dallas has been experiencing some bad weather for the past couple of weeks. Unfortunately, our field was outside, with a tent that was supposed to have "protected" it from the elements. That did not happen. When a particularly bad windstorm came, it tore down our tent and ripped holes in the top, so our field tiles were damaged. As well, it snowed/rained later that week, intensifying the damage, and bending the metal posts.

So, today we had to break it down in ~30°F weather. The metal was so bent that we had to cut the tent into pieces to remove it, and ice had frozen over the plastic siding in multiple areas, making it hard to move. There was also snow still on the roof of the tent, so we inadvertently dumped snow onto our field, probably further hurting our tiles.

Reflections

We need to find a secure way of keeping our field safe. As of now, we are just replacing the tent with another tent, which will most likely just be destroyed in the next windstorm.

Centurion's Helm of +2 Swankiness

11 Jan 2017
Centurion's Helm of +2 Swankiness By Max

Task: Make some Roman helmets for the team

We’re following a Roman theme this year, but nobody’s gonna know it if we don’t look the part. So, we decided it was time to make some Roman soldier style helmets. The most Roman helmets cover the top of the head with the body of the helm, with two additional plates on hinges that cover the cheeks, a protrusion at the back similar to the bill of a ball cap to protect the back of the neck, and of course the iconic curved crest, which would point forwards on the common soldier’s helmet (if the soldier could afford it) or from side to side on the helmet of a centurion (the best soldier of in a group of 100). While it would be nice to mimic the helmet entirely, we don’t have the time or the funds to do that ourselves, and instead opted for a more homespun version.

Our helmets each consist of a construction helmet, the sawn-off head of a broom, and a single screw holding the two together. It’s simple, but it’s cheap, easy, and definitely gets the job done.

Reflections

The helmet has most of the features of a Roman helmet already, but it is still missing the hinged cheek guards. We likely won’t add hinged ones because they could be distracting to drivers wearing them and they would take too long to build, but I have a plan to cut stationary ones out of foam board and socket them into a pair of empty slots I noticed on the sides of the helmets. Also, Tycho suggested that, at least for the drive team, we could fit a few helmets with safety glasses mounted on hinges to reduce the chance that the drivers accidentally go to the playing field without their protective wear.

Cap Ball Lift

12 Jan 2017
Cap Ball Lift By Omar, Jayesh, Darshan, Evan, and Max

Task: Build a lift to try cap-ball scoring

Although we're confident in our robot's ability to shoot balls and press beacon buttons, we decided that in order to be competitive, we should try to score the cap ball. The lift would have to be strong enough to lift the surprisingly heavy ball, but also not take up too much space. Our robot, as like every year, is very close to the 18 inch size limit in all directions, so we needed to think of a volume-saving method of mounting the lift. After considering several methods and remembering other lift mechanisms that we'd seen at previous competitions, we decided to use a series of sliding extrusions. It's a common design and not up to our usual standard of flair, but it's relatively small, flexible in terms of mounting, and only requires one more motor, bringing our total up to seven. We first visualized how we'd mount the lift:


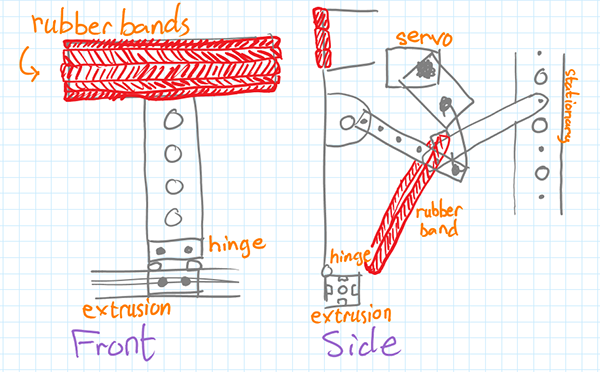
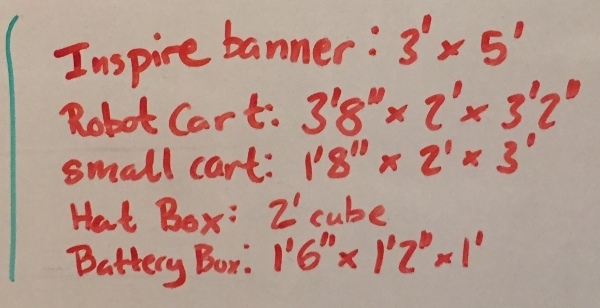
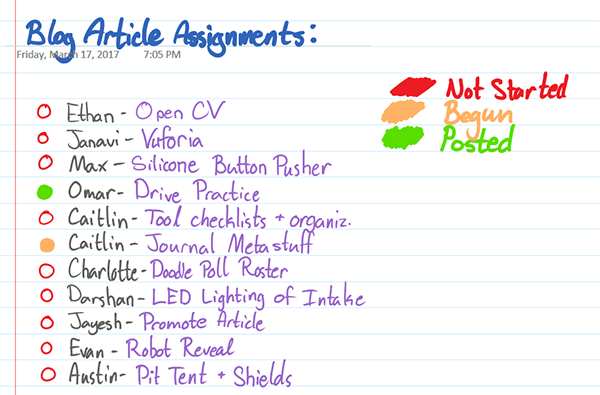
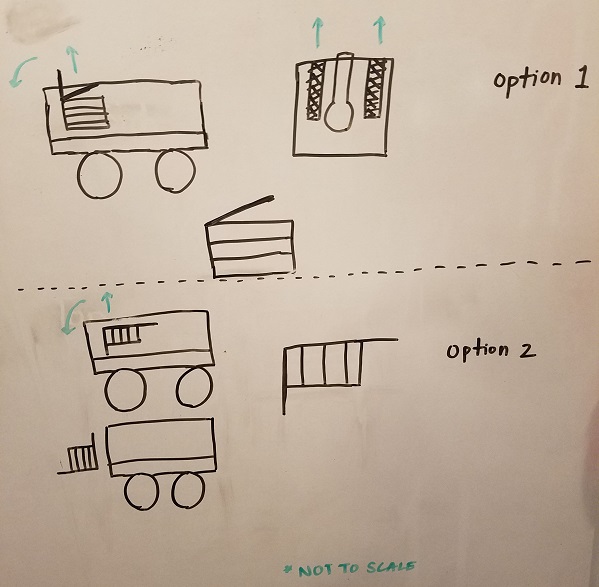
(We went with a mix of both)

Using a YouTube video guide, we were able to assemble two columns of four extrusions each that slide up when pulled by a tough string, which is wound around a spool connected to the new motor. It is mounted on top of the robot rather than on a side because we had the most clearance in the vertical direction. It then rotates forward and stands in the correct position, the motor rotating with it. After several rounds of testing, we decided to use a faster motor, and it proved to be successful in speeding up the lift's ascent.

Reflections

Although it won't be ready for our qualifier, we've made very solid progress on this lift. There are several problems which still need to be tackled. First, we need to figure out what we're going to use to actually grab the cap ball. The lift is useless without it, and even if we use some simple pieces of wood and a servo, there needs to be something there. Second, there is a large space between the rotation point of the lift and the ground, which means that it must somehow reach down in order to wrap around whatever claws we devise around the ball.

Motor Controller Mounts

12 Jan 2017
Motor Controller Mounts By Ethan, Darshan, Max, and Tycho

Task: Prevent static shocks to our robot

Throughout the year, we've dealt with static issues with our robot, as shown here and here. And, now that we've pretty much gotten autonomous and the lift out of the way, the static was our only remaining issue.

To prevent the static shocks, we needed to isolate the motor controllers and other parts from the metal section of the frame. This was achieved by adding a polycarbonate shield on each side, and mounting the corresponding motor controllers. However, we had to partially remove the swinging arms that we created in the last post in order to mount the siding. We plan to add LEDs on each side of the robot to give the robot some "bling".

Reflections

The polycarbonate siding in conjunction with staticide should give us a huge advantage in the robot game for the Jan. 14 tournament. As well, it may net us some design points, as it is a solution to a problem that many FTC teams suffer from.

Bake Sale

13 Jan 2017
Bake Sale By Darshan, Lin, Evan, Jayesh, Omar, and Janavi

Task: Plan Bake Sale

During our winter break, we worked on our robot, but we also planned to gain funding for our continued progression. We had applied for multiple grants but we thought crowd souring would be also be beneficial. One way we thought we could accomplish this was through a bake sale at our school. We found out that we are not recognized as a nonprofit by the IRS which means we can't do fundraising through companies like Chipotle. We also have a PayPal, but online funding can also be very tricky. At this point we've planned out who's bringing what to sell. Although our date hasn't been confirmed, we have planned for the 19th or 20th of January.

Reflections

We realize that funding is obviously a major part of running our robotics team. Doing things such as this bake sale throughout the season could help put a dent in our tab.

Wylie East Qualifier

14 Jan 2017
Wylie East Qualifier By Ethan, Evan, Max, Tycho, Darshan, Jayesh, Omar, Janavi, and Lin

Task: To go to the Wylie East robotics tournament

On Jan. 14, we headed out to Wylie East HS for a North Texas qualifier. Our main goal was to test our new code and additions to the robot - we've added static shields and staticide to protect ourselves from the issues that we suffered from last tournament. We had high prospects this tournament, with a robot further ahead than we've ever been before and a "fun" presentation.

We ended up 3-2 in the main rounds, and at 4th place. The first round we lost was a magestic, catastrophic failure. Our robot ran into the metal sides and short circuited. Then, within ten seconds, every other robot had shut off. We were gettting destroyed at that point, but the powers-that-be decided to call a redo. So, we restarted, and insted of getting destroyed, we got massively, absolutely destroyed by a huge margin. The second time we lost, our robot tipped over, and we couldn't get it back up.

We advanced to finals, and we won the semi-finals round easily. Then, in finals, we faced a combo-team of Technical Difficulties and Technibots, which proceeded to stomp the floor with us and set a new world record in the process.

Reflections

Our main failures through the tournament were that we just can't currently score enough points as higher ranking teams. However, we have a cap ball lift in progress, so well be able to score way more soon. And, we did advance to Regionals, so we've got that going for us.

Wylie East Postmortem

15 Jan 2017
Wylie East Postmortem By Ethan

Task: Analyze what we did wrong and right at Wylie

At Wylie, we did decently. We were mildly surprised that we actually qualified for regionals, but we did, so that's pretty nice.

Mechanical Problems

  • Static shocks
  • Catapult reliability
  • Program unpredictability
  • Autonomous issues

Others

  • We need to be more motivated
  • We need to practice driving

Introducing the New Particle Accelerator

22 Jan 2017
Introducing the New Particle Accelerator By Max

I was going to make a Windows 10 joke but then we stopped using the catapult at version 8.

Task: Design a flywheel for a new system replacing the catapult

So while our catapult was good, we needed something better. It frequently missed and had other issues due to it being dependent on elastic bands that can lose tension over time. It would occasionally miss balls from areas it would usually be able to shoot from. As well, it was just a little dangerous with the metal arm snapping up and down.

At the beginning of the year, we had toyed with the idea of using a flywheel on our robot, inspired by videos such as this, as well as other competing teams at our Wylie and Ellis Davis Field house qualifiers. So, finally, we decided to create a flywheel launcher.

We tested numerous versions of this flywheel. We printed out the same design with three different materials, high density nylon covered in foam tape, high density ninjaflex with 35% infill, and low density ninjaflex with 20% infill. We decided on the last one, as it accelerated the ball the fastest without slipping. We also designed a particle guidance system so that the balls would be more accurate in making the vortex shots.

<infomercial>

Introducing: The Iron Reign Particle Accelerator 1.0

This beautiful piece of machinery is a particle accelerator, which has a huge, ninjaflex, 20% infill flywheel to take all of the particles off the field, and jettison them to the moon (and back down into the vortex). We've revamped our intake system so that we can control the balls going into the accelerator. All of its important parts are designed and 3D-printed by Iron Reign. It is quite literally the best attachment we've ever designed for our robot, and probably could launch people into space faster than NASA can at the moment.

</infomercial>

Reflections

We still need some finetuning in our code for the flywheel, as our autonomous isn't designed for it yet. As well, we'll probably run into some unexpected issue at the tournament, like we always do.

Return to Machine Vision

29 Jan 2017
Return to Machine Vision By Tycho

Task: Prepare to reintegrate machine vision

A year and a half ago while the new Android-based platform was still in pre-launch, we were the first team to share a machine vision testbed on the FTC Forums. That color-blog tracker was implemented with OpenCV on Android, but with a different low-level control system and robotics framework. Then we integrated OpenCV into our implementation of ftc_app, which was in turn based on the great work of rgatkinson's team supporting Swerve Robotics. Our main game repo for FIRST RESQ was also open sourced and we gained a lot of experience using it. But we had many issues that prevented full usage of the capability. There were problems with the whole control system that created extremely variable loop times which really challenged our custom PID implementation. On top of that, we found that in many tournaments the beacons were not working, or the lighting was too bright and our camera was being flooded by the white shell of the beacons. That made it an unreliable solution.

So this year we switched to the modern robotics color sensor as a slightly more reliable method of detecting the current color while up close. This also gave us the ability to add color sensors to both sides of the robot so we no longer have to turn around when on the blue alliance. And we found we had good-enough navigation based on calibrated odometry so that we could get into position without color tracking.

But now we need to go ahead and try to re-integrate our previous machine vision code and see if we can improve on the situation. We also need to at least try out the Vuforia object tracking capabilities, even though we've set that as a lower priority because we know that specular reflections are likely to be a problem under varying lighting conditions at different competition spaces. We've noticed this problem at a couple of spaces due to the marker placement behind the planar polycarb of the border walls. So we don't actually plan to rely on this as a primary means of navigation and positioning, but we should try it out and see how robust it might be.

We still want to use machine vision to possibly track beacons and particles. We are hoping to track particles to create an autonomous behavior that triggers during teleop so that a particle near the front of our particle collector can be automatically approached and pulled in without operator intervention. This should help since picking up particles on the far side of the robot from the drivers is very difficult because of blocked sight lines. We want to use color tracking to make sure we don't pick up opposing alliance particles.

Research / References

I checked out Vuforia and there is no ability to track based on color. So we need to use OpenCV again, but when Vuforia is present it also locks up access to the camera. Fortunately there is now a way to get a frame from Vuforia and reformat the image data for OpenCV's use.

I plan another post to document the actual steps we went through. Stay tuned. If Vuforia proves troublesome, we might revert to getting our image from a camera preview just like last year. Though that would mean messing around with the Android manifest and the layouts in the main FtcRobotController folder.

Helping Imperial Robotics

03 Feb 2017
Helping Imperial Robotics By Ethan, Evan, and Tycho

Task: Help Imperial Robotics before their qualifier

As said in previous posts, we have a sister team, Imperial Robotics, and it would be really nice to see them advance to regionals alongside us. In their previous qualifier, they got really close. So, with help, we should be able to push them over the qualifying line.

Tycho, our lead programmer, helped Rohit and Abhi with their code. Imperial was having servo control issues in which they couldn't continuously rotate their ball-intake servo when pressing a button, and Tycho fixed that, along with other control issues. Tycho also worked on their bass launcher, making it more reliable.

Evan and I helped Imperial with building and driving. We fixed their wheel and turning issues as referenced in this post. Their problem was that a motor wasn't working at 100%, and it interfered in driving. As well, Evan gave Imperial advice on driving, and demonstrated driving techniques. As well, we helped with general fixes of their robot, as most of their team members were focussing on the presentation.

Reflections

Imperial ended up not advancing to regionals, unfortunately. :(

Robot Drive Team

03 Feb 2017
Robot Drive Team By Charlotte, Tycho, Karina, and Evan

Task: Build a solid drive team.

One of the leading problems Iron Reign faces is our ability to allot time to effective driving practice. Driving practice is essential for our success in the robot game, but it is sometimes difficult to find time to practice due to other team members working on various robot improvements. We have created two different drive teams, a main team and a backup team, so that despite who is available at meeting we can always have some kind of drive practice going on. The bulk of the time spent in driving practice is spent practicing putting glyphs in the cryptobox, trying to better our previous time and complete as many columns as we can. We focus on performing and scoring timed runs, and sometimes when our sister team 3734 is available, we scrimmage our robots against each other. Another smaller, yet equally essential, part of drive practice is setting up the robot in the correct orientation for every situation and running our autonomous. It is important that we make all of our mistakes during practice, so that when it is time to compete we run autonomous perfectly every time. The main challenges we face in driving practice is consistency in filling the cryptobox, adjusting to significant robot design changes, and our time management (actually finding the time to get in good practice).

In the future, the drive team is going to meet more often and hold more efficient practices. Our main goal is to significantly decrease the time that it takes to fill the cryptobox, and to accomplish this we will need to clock in many hours so that we are very comfortable in driving the robot. Ideally, any error that might occur during competition will be mechanical errors that are out of the drivers' control. We have improved a lot, but we still have a long way to go.

Fly Wheel 2 - Fly Harder

08 Feb 2017
Fly Wheel 2 - Fly Harder By Max

Task: Create a backer rail to guide the particle as it fires

Our work on the flywheel design has been an effective proof of concept, and now we need to work it in to the rest of the robot. However, just like with the catapult, there’s a couple issues to iron out before all the pieces can start moving in a way that doesn’t make the robot implode.

Most notably to the 3D modeler in me, I fear that our current rails which we use to guide the ball as it is sped along by the flywheel might get caught on the rubber bands of the belt which collects the balls. Both ends of the rail have sharp angles which can easily catch on the bands, and it doesn’t really help that the flexible nylon of the rails means that a rubber band that is particularly stubborn in releasing it could turn our launching system back into a catapult of sorts again.

The fix was quite simple: I used Creo to take out the piece of the rail which ran the greatest risk of being caught, and got rid of some extra bolt holes too since I happened to be in the neighborhood.

Reflections

Not much to report on this one. We’ve printed and tested the model with no catches, and it also seems that the changes to the rail have had no effect on the speed or accuracy with which we can fire the ball. Overall, this one was a simple success.

Forester Field House Robotics Competition

10 Feb 2017
Forester Field House Robotics Competition By Janavi, Omar, Tycho, Max, Jayesh, Evan, Lin, and Darshan

Task: Compete in the Forester Field House Robotics Competition

We started off with our presentation pretty early, and everything was going pretty well until our robot had a static issue, and stopped working. We were able to cover it up pretty well without the judges noticing. One of the judges seemed to like our rap, and was interested in seeing the R.V. Our presentation ran a little long and cut into our question asking time. But other than that the presentation went pretty well. As for scouting, Evan and Omar went around and talked to all the teams, we even created flyers them to pass out the all the teams.

We created a common excel sheet that we all shared on the google drive so everyone could scout when they got time. This time we actually put on shields in advance, and they weren’t made of duct tape! But we also had to replace the core power distribution module. And to do that we had to take off the shields. This resulted in us scrambling at the last minute to reattach the shields while rolling the robot over to the field. We replaced the CPDM because in the past it has been constantly resetting, and seems to have a faulty U.S.B connection. Replacing the CPDM as well as spraying staticide in between match really helped to improve our reliability during the matches. This resulted in us winning the rest of the matches. We ended up in 5th place. During the Alliance Selection we were the first pick of the first alliance captain. During the semifinals around 9 beacons had stopped working and the judges had resorted to holding up spoons with flags when the beacon button was pushed. In the end our alliance won and we also got the second place inspire award. This meant that if we hadn’t advanced already we would have had advanced during this completion.

Reflections

All in all we’re pretty happy with the results of this competition, our robot was more reliable than it usually is and we were able to completely stress test it. We believe the improved reliability was the result of replacing our CPDM and the improved side shields. We may have damaged our previous one simply through electrostatic discharge, ironically making us more susceptable to ESD in our other matches. Decreasing the conductive materials on the outside by properly blocking them with shields will make us more reliable in the future. Next time we need to make a complete check list so we don't forget the import things, like staticide.

Building the Fly Wheel Launcher

10 Feb 2017
Building the Fly Wheel Launcher By Jayesh, Omar, Darshan, Evan, Tycho, and Max

Task: Create a particle launcher with a higher scoring rate

The first particle launcher we saw by another FTC team was actually a crude flywheel and rail design back in October where the rail was a cut up PVC elbow. Back then we considered a number of different designs including impact launchers, catapults, flywheel + rail systems and dual flywheel shooters like our sister team built. We decided to go with a catapult design because Max had experience with catapults and knew that they could create very repeatable trajectories.

Our catapult has achieved those reliable trajectories. We operated it with a choo-choo mechanism that allowed us to fire and re-cock without having to change direction, so that made reloading easier and faster that it might otherwise be. It accurately scored, with consistent ballistic trajectories, however, the system had problems with ball loading when our 3D printed catapult bowl kept failing due to layer separation. As a result we had a lot of misfires and had to replace our bowl often. So our moderate cycle rate and our misfires meant we actually scored only about 4 balls during our average teleop phase. As the season progressed it became increasingly clear that we would have to radically improve our center vortex game and that was driven home when Technical Difficulties and Technibots crushed us with their world record score in the finals match at our first qualfier.

So we decided to move on to a flywheel-based design, knowing that we would likely be sacrificing some accuracy for a much greater cycle rate. We knew that dual flywheels tended to have even greater issues with accuracy due to their extremely short contact period and the chance that one or both wheels would hit a slot in the wiffle ball. We saw direct proof of this as our sister team, Imperial Robotics, struggled to get their dual-flywheel design to work consistently. And Ethan had attempted to build one very early in the season, but never really go it working. So we decided to design with a single wheel with a semicircular ball guide or rail. Max created a custom 3D design for both the flywheel and for the rails. The rails were printed in nylon, our preferred structural plastic. He printed three different flywheels for testing. One was in nylon meant to be covered with foam for compliance. The other two were printed in Ninjaflex (urethane) at different infill densities. The foam on the nylon version shredded at the RPMs we were using. We probably could have found a better adhesion solution, but found that the low-density Ninjaflex version worked beautifully and has stood up to extensive testing.

Reflections

The continuous improvement of designs is a constant focus we adhere to. Previously we'd gone through two major revisions of our catapult system, with a whole bunch of minor modifications, and that system got us qualified for the North Texas Regionals. We saw the pros and cons, and eventually saw fit to change the system to score more points in the long run. We are now able to score around 75% of the balls we shoot. The key is in how quickly we shoot now. Before we would have to collect balls, turn the robot around, load a singular ball into the scoop, and shoot. Now, we can shoot 4-5 balls right after another without turning around. This will allow us a much greater center vortex scoring rate as we aim to be one of the top teams at Regionals.

DISD STEM Expo

11 Feb 2017
DISD STEM Expo By Ethan, Evan, Janavi, Jayesh, Lin, and Max

Task: Present to kids at the DISD STEM Expo

Every year, DISD hosts a STEM expo for local companies and groups to present to kids, in hope of inspiring them to go into a STEM career. So, for our booth, we drove our RV into the Kay Bailey Hutchinson Convention Center to present. We had three activities run by Iron Reign.

The first activity was helping kids 3D print keychains using Google Sketchup. We had nine laptops set up for them to use, all hooked up to four Flashforge Finders. When we first got to the Expo, we discovered that two of our printers had filament issues, so we were running on half capacity the whole day. Even then, we probably helped about 50 kids with their keychains.

In the front of the RV, we had laptops running MinecraftEdu, which features having a teacher have admin control, moderation, a dedicated server, and no PvP. MinecraftEdu is supposed to help kids with problem solving, bolster their creativity, and assist them with working with other people.

Outside of the RV, we were running a robotics workshop where kids could program Lego Mindstorms to do various activities, including robot sumo. Our coach and a few volunteers(from one of our sponsors, BigThought) were working that section.

To Do List Update

11 Feb 2017
To Do List Update By Tycho, Max, Jayesh, Omar, Janavi, and Evan

Task: Update our To Do List

Sensors

  • CDIM #2 on right side
  • color and distance sensors on right side
  • ultrasonic sensors
  • can we get rid of distance sensors?
  • omnidirectional travel sensor based on trackball
  • omnidirectional travel sensor based on I2c mouse

Autonomous

  • simplify approach path to wall
  • simplify beacon detection
  • second beacon
  • compute distance before slowing down
  • alt config to bypass a non-working beacon if it's the first
  • pointed at gap between beacons, drive until touching, square with imu, check / adjust distance with ultrasonic

Authonomous with Vision

  • More team members than Tycho study Fixit3491 videos 4 thru 7
  • Integrate OpenCV 3.2 back into app
  • done
  • Integrate Vuforia sample
  • done
  • Get image from Vuforia into OpenCV
  • in progress
  • stuck with bug
  • Camera mount tweaking to get best vision line
  • Does wide angle work with Vuforia configuration
  • Real Vuforia based auto navigation
  • OpenCV beacon analysis from Vuforia beacon localization

Particle Launcher / Flywheel + Rail Type

  • New grippy custom printed flywheel design
  • complete
  • Custom flywheel printed and assembled
  • done
  • 3 versions
  • nylon, open ninjaflex, dense ninjaflex
  • Rail design - done
  • Rail print - done
  • High speed motors - aquired
  • Frame and mount rails, flywheel and motor - in progress
  • Particle Release Gate and Servo mounting
  • Presentation narrative and blog updates - tie in with earlier design iterations

Cap Ball Fork Lift

  • Replace lift spool with double lift+retract spool made from Tetrix track guide wheels
  • Add slides for fork support
  • Add pulleys for retract spool
  • Add deployment servo
  • Fabricate folding fork
  • Figure out fork release by hyperextension
  • Can we retract cleanly?
  • Can we refold? CR servo reeling in a refold line might do the trick.
  • Code to support these capabilities

Journal / Blog Improvements - ADD STUFF HERE

Awards Guidance Sheets - ADD STUFF HERE

Presentation - ADD STUFF HERE

Robot Reveal Video V1 - Shot List

  • Intro Sequence - half second shots of robot driving into frame from overhead, right side, front
  • Mecanum Freedom - high overhead shot of robot going forward, strafing, diagonal, turning
  • Particle Collector - close up short shots of collector running from side and from front
  • Particle Collector - Pulling in a particle - muliple angles (can one of these be done with a dolly shot of moving particle?)
  • Particle POV - camera on mat - robot strafes into view, engages collector and drives over camera until camera is at accumulator lift
  • Particle Collector - shot from under the robot sitting on polycarb, camera under the polycarb at the rear of the robot lookup up, seeing a particle pulled in, guided by funnel and loaded into accumulator
  • Particle Collector - Automatic Opposing Alliance Particle Rejection
  • Particle Collector - Machine Vision Based Automatic Tracking and Collecting Behavior
  • Particle POV - running up accumulator lift - not sure if this is possible without animation
  • Shooting - with flywheel - wide shot of 4 balls coming out
  • Shooting - close up of Particle Release Gate
  • Shooting - close up of Particles cycling through Launcher while off of robot
  • Shooting - close up of Particles landing in the vortex or on an accuracy marker
  • Cap Ball Lift Deployment
  • Cap Ball Lift Capture
  • Cap Ball Lift Raising
  • Cap Ball Lift Depositing
  • Cap Ball Lift Retracting
  • IMU Close up + 90 degree turn + station keeping behavior(on black turntable; make shot from above)
  • Navigation - Calibrated Odometry in both normal drive and strafing
  • Combined high accuracy Heading and Odometry with Trig = absolute field position (close up of telemetry, plus overhead view of a navigation sequence)
  • Autonomous - high speed of entire sequence - replace with machine vision version when available
  • Autonomous - machine vision localization of beacon targets - phone camera capture
  • Autonomous - beacon isolation and analysis - phone camera capture

Connect Reveal Video - Shot List

  • MXP Crane Shot Opening Sequence - what if? theme
  • MXP Walk through - adjusted BT script
  • MXP construction effort
  • MXP outreach event visual scrap book

Connect Reveal Video - Team

  • Who is on this team? Evan leads?
  • Script Team
  • Voiceovers
  • Existing Video Review
  • New shots and slides
  • Editing

  • Judging and Awards

    16 Feb 2017
    Judging and Awards By Lin, Jayesh, Omar, Tycho, and Max

    Task: Increase chances to advance in judging

    In our competitions we really can't rely on our robot performing as well as it does in practice and our sparring matches with Imperial. If we're going to increase our chances of advancing from Regionals to Super-Regionals 90% of the time it's going to be from judging. We've always had rocky presentations in my opinion, but this year we're getting our energy up and trying to get everyone more interactive. We've heard that the organizers are having trouble getting enough judges, so it's likely the judges will be a little inexperienced. We're making a colored tab and blurb for each award to place at the front of our journal. We'll have a little paragraph on why we think we should be considered for each award, followed by a handful of key posts we believe back up our claim. Each award has a color, each post gets a number, and we place colored tabs (think these post-it flags) with a number written on the printed page.

    Reflections

    Judges don't have much time to inspect pages before a presentation, so it's the job of the first person who goes in to give the journal, a presentation copy (or 2 depending on the table space), and a short description of what's going on. This includes reference pages such as the awards and a copy of our scouting flier. Judges mostly listen and take notes during a presentation, so we don't want to overload them with pages to look at initially, but have enough information available to look through at the main judges meeting. The easier it is for a judge to get a sense of our team, the higher likelihood they will mention us in award considerations. This is a hard balance to strike, but the tabs served us well last year and I should have gotten them together again a while ago. Jayesh and Omar went through our tag page, picking the key ones to bring up. Tycho and Max continued working on their technical posts.

    The Imperator Will See You Now

    18 Feb 2017
    The Imperator Will See You Now By Max

    Task: Design a new banner

    For the past year or two, we've brought along a big vertical banner to our competitions to help boost our presence and make it easier for judges, other teams, and even members of our own team to find us in the pits or on the field. But the banner we've been using has become outdated: Since last year, members have come and gone, we've decided on a different visual theme, and, of course, we've built an entirely new robot. The time has come to begin again.

    We plan to use the same banner stand as last time (although we've dyed it red to match the helmets) to conserve materials, so the banner will have the same dimensions as before. Since we have the same amount of canvas to work with, the design will also incorporate the same components as the last version:

    • Team number (in Hindu-Arabic and/or Roman numerals)
    • Team name
    • Picture of the robot
    • Picture(s) of team members
    • Sponsor logos (optional)

    With some spare time between meetings, I made a draft layout for the banner in Microsoft OneNote. The previous version wasn't much more than some pictures we found and a couple text boxes thrown onto a plain white background, so I wanted to make this banner look like more thought and effort had been put into its design than last year's. I decided on a red background with black and gold trim designs to better match the Roman theme we're going for, with the team number and name at the top, the robot's picture in the middle, and a grid of our team members at the base. To make it all fit together more smoothly, I also planned to get a green-screened picture of the robot and to make individual charicatures instead of pictures for each team member. See if you can determine who's who in the team pictures on the draft version.

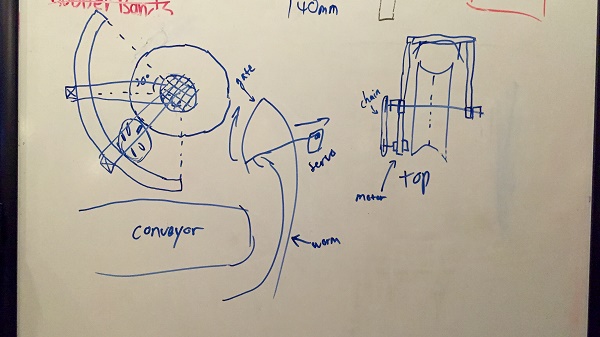
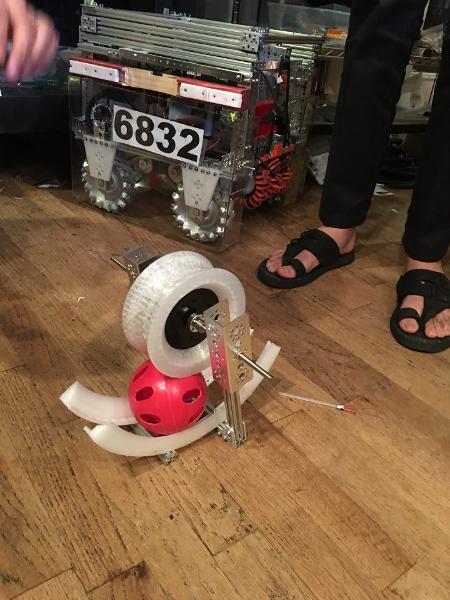
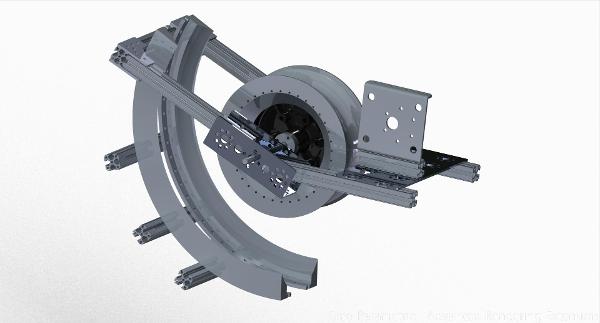
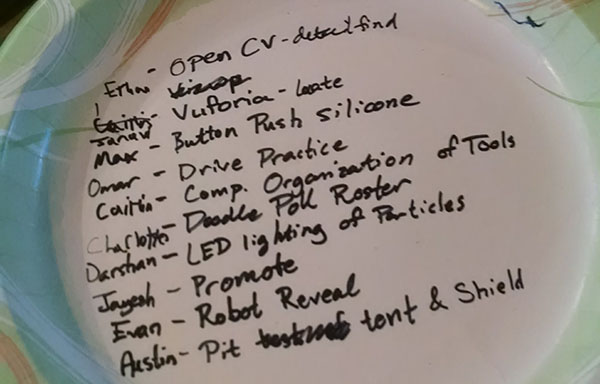
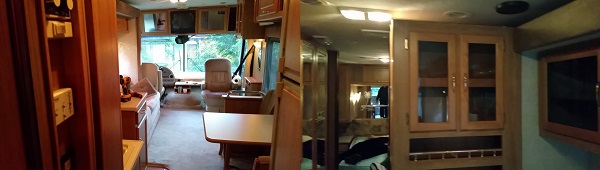
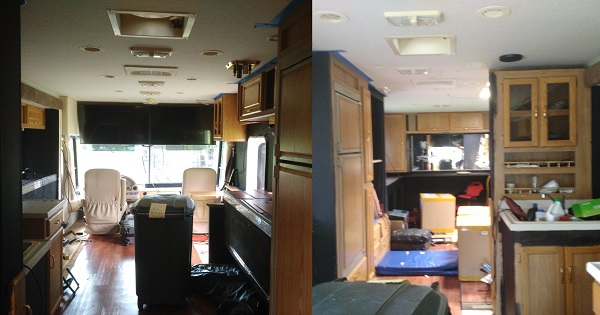
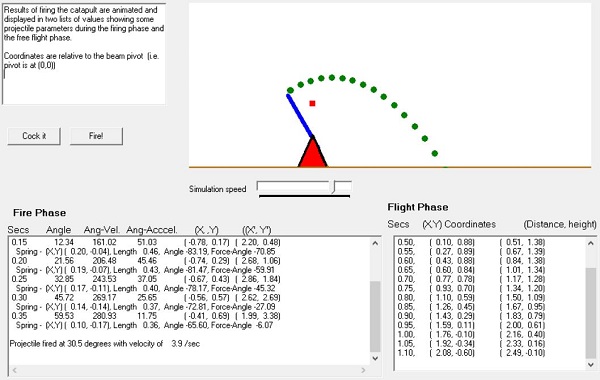
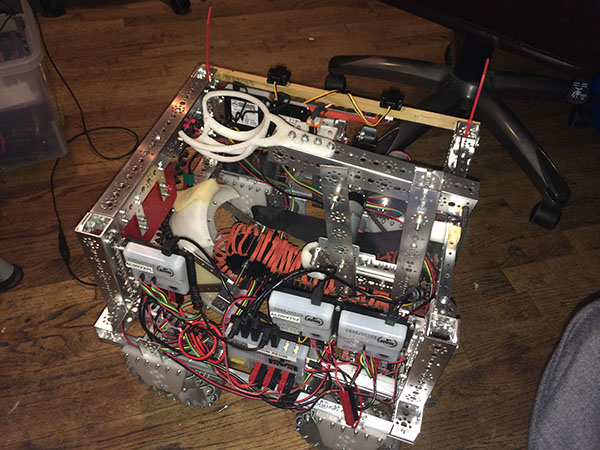
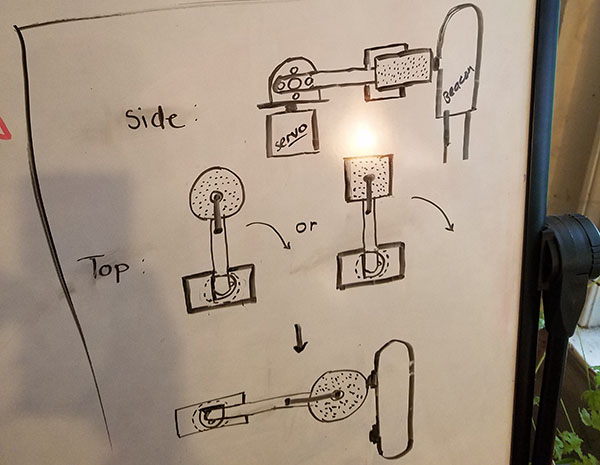
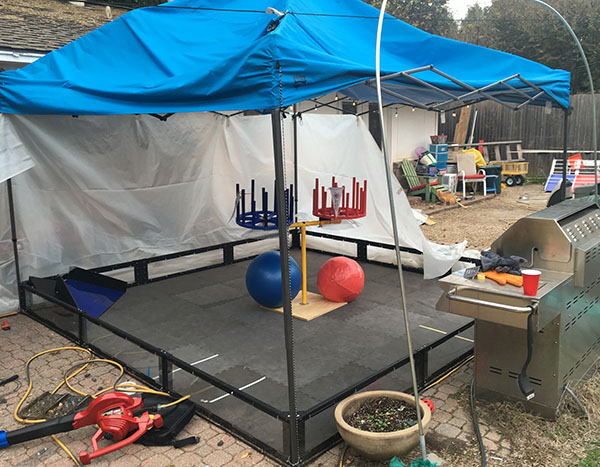
    (there's a picture of it here kbye)

    At the next meet, the team decided that the layout was good to go, so I got to work making a neater version in Adobe Illustrator. With the design complete, you can see how the complete banner looks in Adobe Illustrator below. It'll take a special printer to make it in the correct size, and we'll have to wait a little longer to get access to it, but all in all it should be smooth sailing from now on.

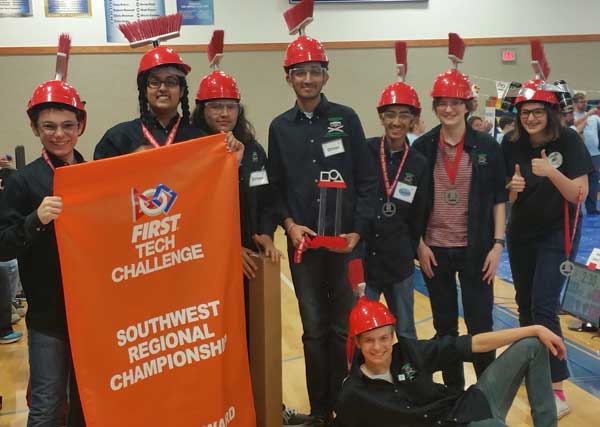
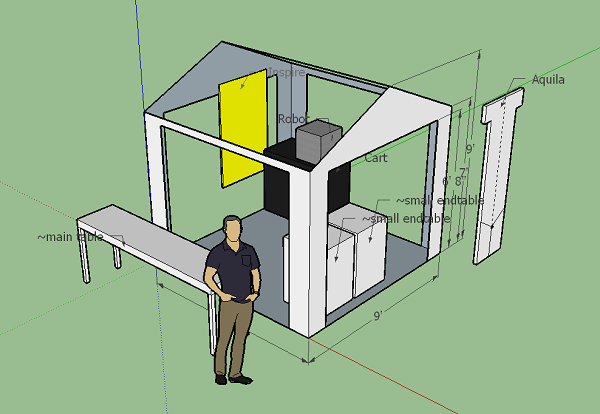
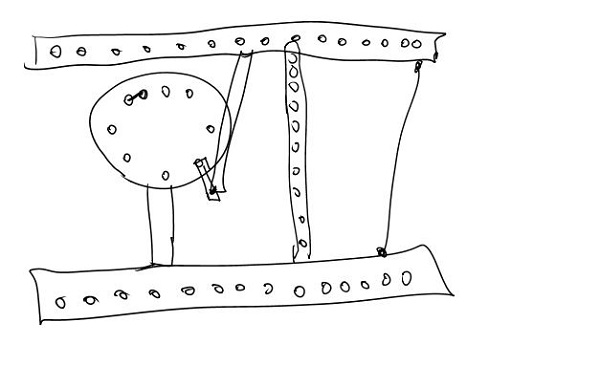
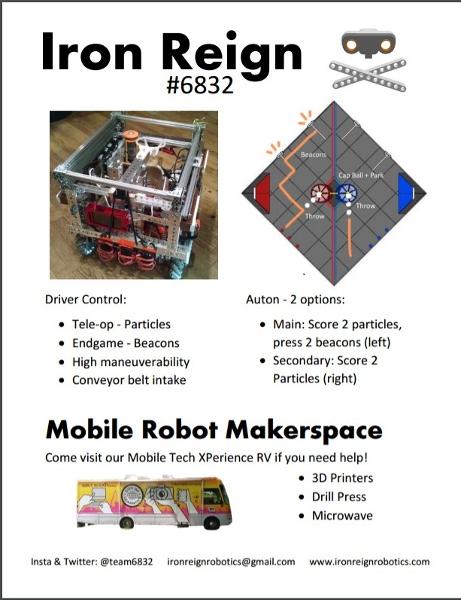
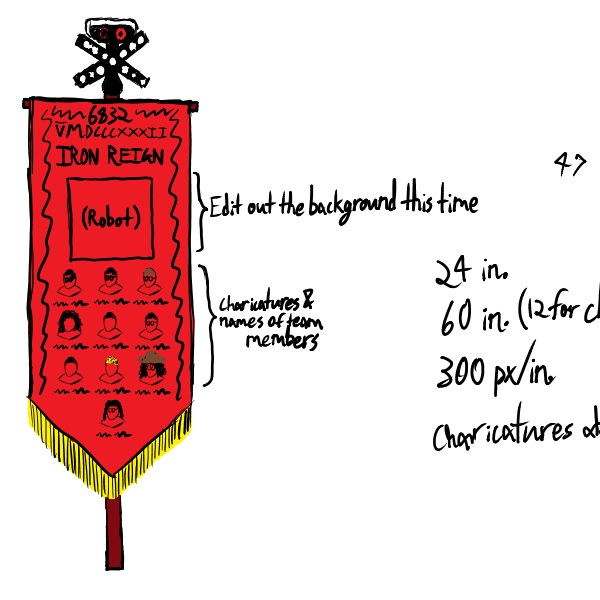
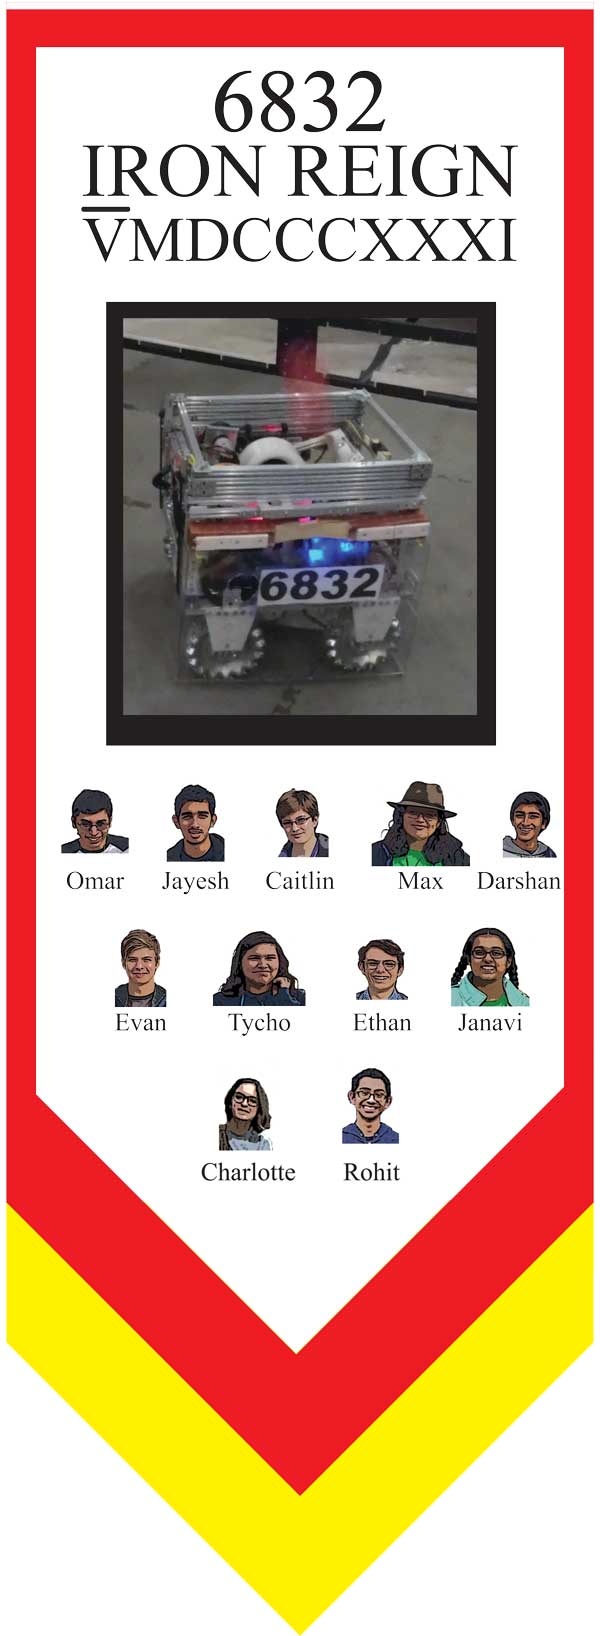
    (aw dayum that's a bootyful banner if i do say so myself)

    Reflections

    The choice to use charicatures of the team members this year on the banner as opposed to a team photo (like we used last year) was one of the most impactful decisions to be made about the subject, but I think that it was the right judgement. Hopefully this can play at least a small part in establishing our presence among the many teams that we will encounter in regionals (and perhaps beyond), but only time will tell how effective the banner can be in competition.

    I Am Become Aquila, Destroyer of Worlds

    19 Feb 2017
    I Am Become Aquila, Destroyer of Worlds By Max

    Task: Resurrect the Ancient One

    The Great One, Aqui'la, has slumbered for too long. Since the deity lost Its battle with the accursed Gravitae a year ago, Its physical form has crumbled to pieces, leaving It powerless to bend the world to our will. As the last High Priest and Grand Memer of Its reign, the duty falls to me to return It to Its full power so that It may reign once more. I must do more than rebuild its effigy, however. To ensure It is not defeated by the forces of Physicks once again, the body must be as strong as the mountains, and as inpenetrable as the darkness.

    Time is short; I must work quickly. I have retrieved the bones of the husk which once housed the Great One, and will use the unholy power of the Tri-Dimensional Prynter through which I first summoned it to rebuild the body. The ABS Plastyck, black as night, with which the old bones were once built, shall be the regent with which I will revive It.

    At the stroke of midnight last night, I performed the Ritual of Creo to obtain the designs with which I may summon Aqui'la. With haste, I brought them to the Prynter. As I write these words, the new form takes shape; the barrier between our world and Its wears thin. The Great One draws nearer with each moment. Hark! The Prynter's work has been completed. I go now to piece together the old bones with the new, and conduct Its conciousness into the new form.

    Reflections

    O FORTUNA

    VELUT LUNA

    STATU VARIABILIS

    Pre-Scouting Regionals

    19 Feb 2017
    Pre-Scouting Regionals By Ethan

    Task: Find out information on teams at Regionals

    One of the things we're weak on this year is scouting. Dylan did some amazing scouting work last year that got us to regionals, but he is no longer on the team. So, for regionals this year, we want to be prepared. We took the list of teams attending the regionals and searched for any teams that we've either gone against and logged, or have any active social media presence. Then, we logged what their robot did and whether it was in teleop or autonomous. You can view the current sheet here.

    If any team needs help making an online engineering notebook, contact ethanhelfman@outlook.com. It helps everyone when you put your notebook online.

    Backups and Shields

    21 Feb 2017
    Backups and Shields By Lin, Omar, Max, and Tycho

    Task: Build a backup flywheel track and remount side shields

    Previously, our side shields were zip-tied through 4 bolt holes on tetrix pieces per side, and we had taken one off to reach our drive system. When putting it back on to fine tune autonomous we took the time to cut out space for a wrench and bolt it on. The holes were already the correct size, we just had to line them up with the mounting position.

    Omar spent a good amount of time inspecting our current track in order to replicate it accurately. Unfortunately, it took him a few tries to get it. We want to have a second copy available in competition if we get hit around too hard or something snaps. One weakness of our previous catapult design was that the bowl broke in a way we couldn't repair, andwe don't want to be in that situation again.

    Reflections

    While It was easy to mount one side of a shield, the other proved to be difficult. The pre-existing drill holes almost lined up, zip ties had enough give, but the bolts definitely didn't. We had to widen the area but it's much more secure now. When we got it to workon the left shield, we clipped the ties holding the right side up and did the same thing

    2017 North Texas Regional

    25 Feb 2017
    2017 North Texas Regional By Ethan, Evan, Jayesh, Charlotte, Tycho, Lin, Max, Darshan, and Janavi

    Task: Win the North Texas regionals

    Summary: We won

    On Febuary 25, we drove our RV to W.E. Pete Ford Middle School, in Allen, TX. The tournament was split into two divisions, and for many of our members, this was our first time encountering that layout. We didn't have any of our team members going to Dean's List interviews this time. We still didn't have an operable cap-ball lift, and this was our first time using our flywheel shooter in a tournament setting.

    We did decently in our presentation, but it could have gone better. We made a few missteps in our presentation and had a few stumbles. However, we did a great job of presenting to the judges who were walking around. We would greet judges and attempt to present to them, ending up presenting to two separate groups of judges about our robot's design, helping low-income families in STEM fields, and our team history. As well, we talked to one of the FIRST directors, Ken Johnson, about our MXP, and we ended up bringing him out to it to show off.

    In the game, we did pretty well. We ended up 5th place, and got picked as 2nd pick for the 1st alliance. We ended up getting all the way to finals, but we didn't win due to the fact that the opposing alliance had Technical Difficulties on it. During the normal games, we won [3-1]. We had issues with our beacon-pressing erasers falling off, so we designed a new "eraser" out of foam tape with a layer of thick tape on top in order to still be able to press the button. Our robot did stop responding during one game, but compared to our previous experiences, that was actually pretty good.

    The reflections post can be viewed here.

    Inspire Award

    25 Feb 2017
    Inspire Award By Tycho, Jayesh, Lin, Omar, Max, Darshan, Evan, Ethan, Janavi, and Charlotte

    1st Place at North Texas Regional Championship

    Iron Reign members left to right are Ethan Helfman (Build, Communications), Janavi Chada (Programming, Communications), Tycho Virani (Programming Lead, Main Driver), Jayesh Sharma (Business Lead, Build, Communications), Darshan Patel (Build), Lin Rogers (Communications Lead, Logistics, Business) and Charlotte Leakey (Programming, Logistics), with Evan Daane (from BTW, Build, Photography) in repose. Not shown: Max Virani (Design Lead, Programming), Omar Ramirez (Build Lead) and Rohit Shankar (Programming).

    Wow, we did it. I mean, we were going for it, but wow - we did it! Out of 118 teams competing in our region, we got 1st Place Inspire (Top Award) at our regional championship! We finally earned the coveted Inspire Banner. We've been building toward this for 7 years! Ever since we started as an FLL team.

    Our total awards included Inspire 1st, Finalist Alliance 2nd, Motivate 2nd, Connect 3rd, Innovate 3rd.

    Not going to Disney World yet

    We are now qualified for the Texas State UIL Robotics Championship and the 12 State South Super Regionals. And we are preparing with the goal of making it to the World Championship. We have an extended season and while some of us have been to super regionals before, this is the first time the whole team gets to go. Our coffers are empty, we need a whole new round of fundraising to keep up the progress for the extended season. We need your help! Please consider contributing to support our extended season and help us represent North Texas at Supers.

    In case you don't know how the game works, it's broken into a 30 second autonomous phase followed by a 2 minute driver controlled period. Two alliances of two robots each compete in each match. Here is our division winning match with alliance mates Technibots. Autonomous:

    And Tele-Op:

    Regional Postmortem

    02 Mar 2017
    Regional Postmortem By Ethan, Lin, Austin, Jayesh, Omar, Darshan, Max, and Tycho

    Task: Analyse what we did right and wrong at regionals

    Scouting:

    Good

    • Detailed scouting sheets
    • Had good inter-team dynamic
    • Organized
    • Pre-scouted

    Bad

    • Not scouting matches
    • Didn't record matches
    • Scouting sheet on one computer
    • Only one scouting team

    Notes: While we did well with scouting, it could have gone off much better. We made some mistakes by accidentally scouting teams in the other division and not watching matches when we should have.

    Presentation:

    Good

    • Eventually got into a groove
    • 🔥🔥Darshan's sick beats🔥🔥
    • Emphasized MXP
    • We were entertaining

    Bad

    • Messed up the intro
    • Not about past achievements
    • Transition timing
    • Only one scouting team

    Notes: We need to work on the group dynamic and enthusiasm a bit more. As well, we're going to stick Darshan under the cart so he can pop out with those 🔥🔥sick beats🔥🔥.

    To-do

    Promotion:

    • Need to make a reveal video
    • Need to advertise on social media
    • Design booth for super-regionals
    • Write more blog posts
    • Promote & Outreach videos
    • Banner holder designs

    Design & Programming:

    • Fix robot shooting accuracy
    • Replace erasers with silicone
    • Cap the ball
    • Robot vision
    • Build 2nd spinner
    • Model the robot

    Super Regionals Booth Design

    04 Mar 2017
    Super Regionals Booth Design By Lin, Austin, and Omar

    Task: Design a theme and layout for super regional pits

    A year or two ago Imperial advanced to Super Regionals, bringing along a few Iron Reign members. While teams get excited and have a lot of fun at Regionals, it's nothing compared to the displays found at super regionals. We've grown into our cyber-Roman theme this season, and Omar is currently working on a logo to match our new color and feel. Hats won't be enough at this level though, we've got to step it up a notch! Austin and I first looked for a base image, first looking up Roman forts, then moving to campsites. The forts weren't as recognizable, and the tents could be set up much easier. We drew most of our inspiration for the booth theme from the image above, credit to Gaius Hibernicus on Flickr.

    Having a recognizable theme is important on two points: scouting and sponsors. Sponsors are more likely to be generous if we can point to a display and show them that people will look at our setup and see their names on it. It's the way to thank them for their generosity in the season. When scouting, you want to be remembered. A forgettable team isn't chosen. Super Regionals usually has teams that have already made alliances over the season, so if you aren't one of those, you've got to stand out in both the game and in the pits.

    Reflections

    Oddly, this competition has a pit size of 9'x9', not the usual 10'x10', so we will be designing to that measurement, and hopefully expanding it later. Austin designed a base frame structure in SketchUp and I started making models of our carts, banners, and tables to be arranged after. We need enough sign space to display our Inspire banner, sponsors, school banner, and team aquila. The robot cart needs a clear path to the workspace area, and we need space up front for pins, a display with our outreach and robot reveal running, and a trophy display. I've made models for these because we already have them, and have begun the shuffling and brainstorming.

    Austin created a Roman style shield in a record time, using old field mats as the core and sawed off broom handles (left over from the hats) to keep them stiff. We ran out of daylight to scrub them clean of dirt, but did that this practice. When we were sure the tape would adhere he covered the front in red duct tape with a gold border. He also mounted an IKEA bowl to the front as decoration, and is planning to round the corners off so he can mount a LED strip along the edge. It already looks really impressive, and we have more materials to make a second if we keep the pace up.

    The structural design of the tent was adjusted for simplicity's sake; we're making a cube as large as the competition allows, and hanging tan fabric/ripstop nylon along the different sides to create the tent shape. The PVC supports are going to be wrapped in a worn/tea-stained look material to keep it unified. Our two smaller rolling carts will have our front displays, and since they have shelving, they can serve as storage for the boxes that don't need to get pulled out as often during the competition. We can mount a shield to the front if we want to cover them up. The Inspire banner is bright enough that it can likely be seen easily from the back or side of the tent, the school banner will go across the top above everything, and the aquila will likely go in the front on the left, beside the displays.

    Meet me in the pit- Tent and Shields

    04 Mar 2017
    Meet me in the pit- Tent and Shields By Austin, Lin, Tycho, Omar, Darshan, Jayesh, and Max

    Tent Building

    Since we had the general idea of the shape and size of the actual pit tent, we set out to either build or find a tent that we felt best fit the theme we selected. We chose to start off by trying to build a structure via PVC pipe and a tarp like substance that we could drape over the pipe, we handed off the idea and models to Mr. Virani to have him figure out what PVC requirements we would have to fulfill and the cost to build. While he crunched the numbers a group left the house to see if we could find a suitable material to drape over the structure; Tycho, Mrs. Lux, and I went to a local army surplus store in hopes of finding a parachute like material that we could use, however the only cloth available was a very heavy and expensive canvas that we decided would end up crushing the frame, (we didn’t leave empty handed though since the store had lots of fun items). After returning to the house we had another council with Mr. Virani and decided to consider other options since the PVC and tarp idea required to much effort and too much American currency. Various hardware and surplus store websites later we found a rather unconventional shaped tent used to cover cars that was built in two sections each measuring 8’X9’ at their base, we concluded to buy the tent and use the parts to only build one of the sections, and since the pit measures 9’X9’, use the remaining foot of space in the front for table with room for a TV to play various team promoting videos meant to catch a passerby’s eye.

    Shields

    In terms of the shield, the basic form is completed and ready to be upgraded via LED’s and insignias which will hopefully be mounted before competition. Due to the use of recycled parts the shields are cheap, sturdy, easy to build, and most importantly relatively accurate looking. Expanding on how they were made, the core is old floor tiles from a competition field that have be locked together on one face and had the remaining teeth cut off. To provide structural integrity, old black metal broom handles were attached via zip-ties length wise to the back face of the shield bridging the gap between the two halves. Next more zip-ties were used to create a basic handle design to carry the light shield around. We chose a weathered red duct tape to cover the front face of the shield since it had the appearance of old weathered wood and saved us the pain of having to paint the shield, following the red duct tape the outside edges of the shield were gilded with a nice golden duct tape. To finish off the shield I used a drill press to mount some spare tetrix pieces to the inside of an ikea bowl and pushed the extruding tetrix remnants through the shield and zip-tied them together to keep them from coming out. Oddly enough most of the parts I used were sourced from our robotics “warehouse” and are easy to find or cheap to buy, so building one of these shields on your own would be easy. Not only is the shield light, cheap, and recycled it’s also pretty sturdy, once we had one built we were eager to play with it and made this little video for you to enjoy below.

    To Do List

    10 Mar 2017
    To Do List By Janavi, Tycho, Max, Jayesh, Omar, Lin, Austin, and Darshan

    Task: Update our To Do List

    Sensors

    • CDIM #2 on right side
    • color and distance sensors on right side -done
    • ultrasonic sensors
    • can we get rid of distance sensors?-done
    • omnidirectional travel sensor based on trackball- not high priority
    • omnidirectional travel sensor based on I2c mouse- not high priority

    Autonomous

    • simplify beacon detection
    • second beacon
    • compute distance before slowing down
    • alt config to bypass a non-working beacon if it's the first
    • pointed at gap between beacons, drive until touching, square with imu, check / adjust distance with ultrasonic

    Authonomous with Vision

    • More team members than Tycho study Fixit3491 videos 4 thru 7
    • Integrate OpenCV 3.2 back into app-done
    • Integrate Vuforia sample -done
    • Get image from Vuforia into OpenCV -done
    • Camera mount tweaking to get best vision line
    • test + upgrade to faster phones for better video processing - done
    • Does wide angle work with Vuforia configuration
    • Real Vuforia based auto navigation
    • OpenCV beacon analysis from Vuforia beacon localization

    Particle Launcher / Flywheel + Rail Type

    • New grippy custom printed flywheel design
    • complete
    • Custom flywheel printed and assembled
    • done
    • 3 versions
    • nylon, open ninjaflex, dense ninjaflex
    • Rail design - done
    • Rail print - done
    • High speed motors - aquired
    • Frame and mount rails, flywheel and motor - done
    • Particle Release Gate and Servo mounting- done
    • Presentation narrative and blog updates - done

    Cap Ball Fork Lift

    • Replace lift spool with double lift+retract spool made from Tetrix track guide wheels- done
    • Add slides for fork support- done
    • Add pulleys for retract spool- done
    • Add deployment servo
    • Fabricate folding fork
    • Figure out fork release by hyperextension- done
    • Can we retract cleanly? -done
    • Can we refold? CR servo reeling in a refold line might do the trick.
    • Code to support these capabilities

    Journal / Blog Improvements -

    • lift and improving it
    • making the new side guards
    • assembling the canopy
    • robot reveal

      Awards Guidance Sheets

    • control award
    • fire beats cd

      Presentation - ADD STUFF HERE

    • pratice it!!!
    • increase info- mabye???
    • add charlotte and austin to the presentation

      Robot Reveal Video V1 - Shot List

      • Intro Sequence - half second shots of robot driving into frame from overhead, right side, front d
      • Mecanum Freedom - high overhead shot of robot going forward, strafing, diagonal, turning d
      • Particle Collector - close up short shots of collector running from side and from front d
      • Particle Collector - Pulling in a particle - muliple angles (can one of these be done with a dolly shot of moving particle?) d
      • Particle POV - camera on mat - robot strafes into view, engages collector and drives over camera until camera is at accumulator lift d
      • Particle Collector - shot from under the robot sitting on polycarb, camera under the polycarb at the rear of the robot lookup up, seeing a particle pulled in, guided by funnel and loaded into accumulator
      • Particle Collector - Automatic Opposing Alliance Particle Rejection
      • Particle Collector - Machine Vision Based Automatic Tracking and Collecting Behavior
      • Particle POV - running up accumulator lift - not sure if this is possible without animation
      • Shooting - with flywheel - wide shot of 4 balls coming out
      • Shooting - close up of Particle Release Gate d
      • Shooting - close up of Particles cycling through Launcher while off of robot
      • Shooting - close up of Particles landing in the vortex or on an accuracy marker
      • Cap Ball Lift Deployment
      • Cap Ball Lift Capture
      • Cap Ball Lift Raising
      • Cap Ball Lift Depositing
      • Cap Ball Lift Retracting
      • IMU Close up + 90 degree turn + station keeping behavior(on black turntable; make shot from above)
      • Navigation - Calibrated Odometry in both normal drive and strafing
      • Combined high accuracy Heading and Odometry with Trig = absolute field position (close up of telemetry, plus overhead view of a navigation sequence)
      • Autonomous - high speed of entire sequence - replace with machine vision version when available
      • Autonomous - machine vision localization of beacon targets - phone camera capture
      • Autonomous - beacon isolation and analysis - phone camera capture

      Connect Reveal Video - Shot List

      • MXP Crane Shot Opening Sequence - what if? theme
      • MXP Walk through - adjusted BT script
      • MXP construction effort
      • MXP outreach event visual scrap book

      Connect Reveal Video - Team

    • Who is on this team? Evan leads?
    • Script Team
    • Voiceovers
    • Existing Video Review
    • New shots and slides
    • Editing

    Spring Break Doodle Poll

    10 Mar 2017
    Spring Break Doodle Poll By Charlotte, Ethan, Evan, Lin, Omar, Max, Tycho, Janavi, Jayesh, Darshan, and Austin

    Task: Spring Break Meeting Planning

    In order to organize a plan for our spring break meetings, we created a poll on doodle.com. We all had individual plans for the break, and with the Doodle Poll we were able to see an overview of everyone's availability. As we have a Super Regional competition coming up, we are on a surge during spring break to complete our many goals regarding the robot, the presentation and more. We have been staying later than usual and attending more meetings to get as much work done as possible. We are anxious and excited to compete in this competition and are willing to put as many hours as we need in order to be completely prepared, including spending time during our break to attend meetings.

    Reflections

    We have used Doodle Polls in the past, and we plan to use then in the future, as they are helpful in planning our meetings in preparation for Super Regionals. It is important for us to stay organized as a team so that we can focus more on our robot and the game. A tool that seems menial, like the Doodle Poll, is very helpful for our team.

    Dallas Women in STEM

    11 Mar 2017
    Dallas Women in STEM By Lin, Tycho, Max, Jayesh, Janavi, Omar, and Austin

    Task: Teach LEGO EV3 and 3D modelling to girls

    The Yale club of Dallas organized a STEM event for groups of girls in the city. We took the Mobile Tech XPerience out front for 3D modelling and set up 8 EV3s with laptops and a sumo field inside.

    Programming

    We led 6-8 girls at a time through the EV3 environment to make a basic sumo program, going through a tournament, and then a final grand melee at the end of the sessions. A couple had experience with EV3, more with Vex, but this session was a lot of their first experiences with programming and robots. Tycho taught the thought process of the program as we went through the steps and I presented on a projector as he went, sometimes taking over talking when we needed breaks. The port view in the programming environment was a great tool to explain the color sensor's light intensity measurement as we could just ask everyone to plug in their bots and see how the numbers changed with the environment. The session was too short to really let them explore what they could do in the program, but we did give hints that the Power variable was something they could tweak. The girls that took the risks in their program generally found that option and won the round robin.

    Everyone in the room had a bunch of fun, chaperones included. One girl realized that she had a NXT at home, and now that she knew she could do cool stuff with it, she was excited to try it out. A lot of the teachers asked about the competition levels, and we're hopeful that some of the kids will join a FLL team and the 8th graders going to high school will look for a FTC or FRC team.

    Teaching Sumobots at #DallasWEST! #omgrobots #mobiletechxperience #dallascityoflearning

    A post shared by Iron Reign Robotics FTC (@team6832) on

    Modelling

    For the first deployment in a while all 4 printers worked! We were able to print every single design from the day. A couple of the laptops don't have the correct export to STL option, but we were able to work around it by grabbing a flash drive and bringing the file over to a different one. The groups in each session were pretty small compared to the waves that normally come by in an expo, so we could spend a good amount of time making sure no-one was lost. Some people grabbed the wrong design when they came back, but we've gotten the swing of things and sent text notifications to the teachers pretty quickly. Since we were parked out front the groups passed us on the way out and picked up their keychains.

    Practice Laps

    11 Mar 2017
    Practice Laps By Omar, Jayesh, Tycho, Darshan, and Evan

    Task: Get some organized driving practice in before Supers

    With Superregionals drawing near, we thought it prudent to better organize ourselves in terms of driving teams. We've never felt that we were 100% solid, with people not knowing what to do at certain times in the match. For example, our "Coach" position was almost entirely dedicated to yelling out the match time in 10 second intervals. Today, we talked about our three different roles (Driver, Co-Driver, and Coach) and what each should do. We did several practice matches, rotating through positions each time just to gain practice in each.

    Reflections

    A large fault our team has always had is focusing too much on improving and working on the robot and not leaving enough time for driver practice. In the coming Spring Break week, we hope to meet several times in order to make sure our teamwork and communication is solid.

    Promote Video 2017

    15 Mar 2017
    Promote Video 2017 By Max

    Task: Create a video outlining Iron Reign's outreach

    We have had a lot of interest garnered towards the STEM outreach the team has committed to. When we found that FTC encouraged the creation of a video outlining the STEM outreach we had done, we saw it as an opportunity to show others a general overview of our activities. With Max's excellent voiceover, we made a video talking about how long the team's been at it, the various STEM expos/events we do, and how the problem of summer learning loss lead us to making the Mobile Tech Xperience.

    Reflections

    Making a connection and advancing our community has always been a priority with our team. This video helps give us a short summary to show parents and children the benefit of commiting to the STEM field, specifically in robotics. We started because of two parents who decided to start a robotics team with some energetic middle school 7 years back, and look at us now. We want to tell these interested parents and kids about how their dedication can create something special, and we're doing that by using ourselves and FIRST as examples. We plan to spread this video to those looking to get into FIRST, or even those simply interested in what our team does besides build complicated contraptions.

    Dinner Discussions

    17 Mar 2017
    Dinner Discussions By Lin, Max, Tycho, Jayesh, Darshan, and Evan

    Task: Set last practices' priorities

    Many members were out of town this break but we still managed to make a good deal of progress. What we forgot to do was post about it. Github kept track of code edits and we have other records of the practices, so we have a list of 11 articles to be written by this Sunday at the latest. Tomorrow's practice (Saturday March 18th) will be focused on:

    • Driver practice
    • Presentation practice
    • Staging as much as possible for packing

    Reflections

    Each member is assigned an article for this weekend and we won't be taking up practice time for this. The list was originally written on my plate after I had pizza, but it's now being sent in our chat and updated as people write. Omar posted his first, an hour before I'm writing this.
    Also: Ethan - Please. Don't use backslashes. I have to edit your posts 90% of the time because your paths break in the tag index pages.

    Beautiful. Truly.

    Editing the Reveal Video

    17 Mar 2017
    Editing the Reveal Video By Evan and Omar

    One man's harrowing journey through copyright free music lists

    The Robot Reveal video is underway. With most of the filming done, the sky grows dark and the day ends. A night time of editing sets in for the poor miscreant who volunteered for the task. Huddled in the corner with a raw fish and his precious computer, the boy opens premiere pro to begin. All is right with the world. The five hour long dramatic saga of trying to figure out the dang code to his Adobe account is through and the password has been changed. He knew he never should have let his family use his student status for a discount. But it's over and he's decided to leave it in his past. Time to edit...

    So the editing for the Robot Reveal video has begun and so far it's gone fine. I had an easy time getting it all in and except one crash(everything was recovered) it's been good. There won't be too much extreme editing to do. Nothing mind bending. Mostly cutting and arranging. The big problem now is finding a song to use that fits the video. I'm having trouble finding something pleasant sounding, fitting, un-copyrighted, and that lines up with the length of the video. I've been listening to a ridiculous amount of un-copyrighted music. An insane amount. It's not copyrighted for a reason. No man or woman or animal or object should have to endure this. The un-copyrighted playlists should be used as an enhanced interrogation technique and then banned by the UN for being a violation of basic human rights. Its all a bunch of extremely similar songs that should either be in the background of a shirtless guys vlog or the basis for an art students performance piece. A few outliers are some EDM and elevator music and I don't know which one makes me want to pour hot wax into my ear holes more. I'm listening to a song right as I'm writing this. I think it's the background music for the most generic cooking channel on YouTube ever. One way or another I'm going to get this done. Maybe I've made a few hyperboles throughout the post but the robot reveal will be finished. I've saved all the music I think could work into a playlist that I'll let everyone give a listen to at tomorrow's meeting. Now I must return to my hell.

    Vuforia

    18 Mar 2017
    Vuforia By Janavi and Tycho

    Task: Use Vuforia to enhance autonomous

    We use Vuforia and Open CV vision to autonomously drive our robot to the beacon and then click the button corresponding to our team's colour. We started this by getting the robot the recognize the image below the beacon and keep it within its line of vision. Vuforia is used by the phone's camera to inspect it's surroundings, and to locate target images. When images are located, Vuforia is able to determine the position and orientation of the image relative to the camera.

    To start setting up our robots vision, we watched Team 3491 FixIt's videos on Vuforia to help us understand how to set it up. After finishing the code for following the image, we went to go test it out. We found out that we had accidentally coded the robot to follow the picture by moving up and down, as we had coded the phone for portrait mode instead of landscape. After fixing that, we tested out the robot and it ended up attacking Tycho by running at him and the image at full speed. Apparently, we had accidentally told the robot to go much farther than it was supposed to go by placing a parenthesis in the wrong spot. We tested the code one more time, only this time I held the picture while standing on top of the chair. Luckily the robot worked this time and was able to follow the image both ways.

    Reflections

    We would like to explore the uses of Vuforia+OpenCV. We are considering using it to determine particle color as well as using it to view the images beneath the beacons.

    OpenCV

    18 Mar 2017
    OpenCV By Ethan and Tycho

    Task: Implement OpenCV in autonomous

    Last year, we had some experience with OpenCV to press the beacons, and this year we decided to do the same. We use OpenCV to find the color we are looking for on the beacon in conjunction with Vuforia. First, it detects the search pattern in the view with vuforia, then isolates that area and finds the side of the beacon with the correct color. Our code is based off of FTC team 3491, Fixit.

    In a previous post, we talked about OpenCV and Vuforia research, as well as how we plan to use it in the robot game. And now, I am happy to say, we have implemented it partially in our autonomous. We can now figure out what side a specified color is on the beacon using our new phones, the Galaxy S5. (Side note - do not update them to Android Lolipop if you want to use OpenCV, it will not work.)

    Reflections

    In the future, we would like to implement OpenCV so that we can detect the color of a particle during autonomous and pick it up to shoot it. However, we probably don't have time to program it before Super Regionals.

    Packing lists

    18 Mar 2017
    Packing lists By Lin, Janavi, Ethan, Omar, and Evan

    Task: Get prepped for the trip

    Every post I write about organization seems to start off talking about how Iron Reign hasn't had the best track record with this sort of thing in the past, but we try anyways. So, like always, we're trying to get everything put together that we can: journals, presentations, props, pit setups, etc. Tools are a little more organized than normal because I'm obsessively trying to make sure nothing important gets lost in these last practices. Batteries have been checked for internal resistance, freshely labeled, and the battery box has more USB ports for our dozen phones. Even the Powerpole box showed up again, back from hiding inside another box across the room...

    Reflections

    The tent materials are already pretty much together, but we need to clear off the two rolling carts and put together everything for the front setups. None of that is going to be used in practice so we're free to stage it for packing. I think we'll be needing a larger box for judging props, everything can rest inside, but we can't close it up. Longer travel distance means we'll need a sturdier method. The battery box is pretty self contained already, and the Container Store chest of drawers has miraculously remained in use, so we won't be scrambling to pack tools that people are using up until the load. I'm worried about the journal printouts and the control award honestly, I'm going to print all new posts at home on Monday and then punch them into our binder. If i can find someone free then I'll enlist them to add detail and diagrams to our Control Award writeup. Rise of Hepheastus 4216 was a huge help with Control! They gave us an idea of how much to write, and we would still be a little lost without them.

    Contact Us

    E-Mail: ironreignrobotics@gmail.com Website: In the address bar